MediMate's User Guide
Introduction
MediMate (MM) is a cross-platform desktop application designed to help medical professionals efficiently manage patient data. Whether you currently use paper records, electronic records, or other applications to store patient information, MM provides an effective solution for updating, accessing, and adding new patient details easily.
MM is intended for medical professionals who possess basic computer skills, such as the ability to navigate through folders and files on a computer, use a keyboard and mouse, open and close applications, and enter data into forms and fields. The user interface of MM has been designed to be intuitive and easy to navigate, accommodating users with varying levels of computer proficiency.
MM is cross-platform compatible, which means that it can be used on different operating systems such as Windows, Mac, or Linux, allowing users to access their patient data from any device they choose. By using MM, medical professionals can manage patient data more efficiently and effectively, which can lead to better patient outcomes.
Table of Contents
- Introduction
- Features
- Saving and Editing Data
- FAQ
- Restriction for Add and Edit
- Command Summary
How to use the User Guide
This user guide is intended to provide you with clear and concise instructions on how to use MediMate (MM) to manage patient data. To make the most out of this guide, follow these tips:
- Start with the table of contents: The table of contents provides an overview of the guide’s sections and subsections. This will help you locate the information you need quickly and easily.
- Identify your specific needs: Identify the task you need to complete in MM and locate the corresponding section of the guide. For example, if you need to add a new patient, find the “Add a patient” section.
- Read the section carefully: Read the section carefully and ensure that you understand the instructions before proceeding. Take note of any important warnings, tips, or notes.
- Follow the step-by-step instructions: Follow the step-by-step instructions provided in the section. Use the visual and/or textual cues to indicate which graphics go with which set of instructions.
- Use the glossary: If you encounter unfamiliar terms or phrases, consult the glossary at the end of the guide for their definitions.
- Use the hyperlinks: The guide contains hyperlinks that can take you to other relevant sections of the guide or external resources. Use them when necessary or expected.
By following these tips, you can effectively use this guide to manage patient data in MediMate. If you encounter any issues or have any questions, please consult the troubleshooting section or contact the MediMate support team for assistance.
Quick Start
- To check if you have Java
11or above installed on your computer, open a command terminal and type the commandjava -version. If Java is installed, the terminal will display the version number. If not, you can download Java 11 or later from the official website: https://www.oracle.com/java/technologies/javase-jdk11-downloads.html - Download the latest version of the MediMate.jar file from the following link: from here.
- Copy the downloaded file to the desired folder on your computer that will be used as the home folder for MediMate.
- To open a command terminal on Windows, click the Start button, type
cmdin the search bar, and press Enter. On Mac, open the Terminal application. Navigate to the folder where you saved the MediMate.jar file using thecdcommand. For example, if the file is saved in theDownloadsfolder, you would enter the commandcd Downloadsin the terminal. Then, use the commandjava -jar MediMate.jarto run the application. The graphical user interface (GUI) will appear in a few seconds with sample data included.

- After running the application, the MediMate user interface will open. The user interface consists of five parts: the command box,
result display, left panel, right panel, and patient medical report. The command box is where users can type commands to perform various tasks
in the application. The result display shows the outcome of the executed command. The left panel provides a list of patients, while the right panel
displays the details of the selected patient record. The patient medical report displays the medical history of the selected patient.
The user interface is designed to be simple, intuitive, and easy to navigate, with a menu bar and buttons for performing common tasks.
A sample data set is included to help users get started with using the application.
- Type the command in the command box and press Enter to execute it. e.g. typing
helpand pressing Enter will open the help window.
Some example commands you can try:-
list: Lists all patients. -
add n/John Doe p/98765432 e/johnd@example.com a/John street, block 123, #01-01 ag/20 m/cough t/classmate: Adds a patient namedJohn Doeto the Patient List. -
delete 3: Deletes the 3rd patient shown in the current list. -
exit: Exits the app.
-
- Refer to the Features below for details of each command.
Glossary
The glossary is at the top of the user guide to help you quickly find definitions for any technical or specialized terms used in the guide. This will make it easier for you to understand the content and navigate the guide more effectively, especially if you are new to the software or system being described.
- Add - A command or button function that allows users to add a patient to the MediMate application.
- Alphabetical order - A way of organizing data or information in order based on the letters of the alphabet.
- Appointment - A scheduled meeting between a patient and a medical professional for medical evaluation, diagnosis, or treatment.
- CLI - Stands for Command-Line Interface, a text-based interface used to interact with the computer or software.
- Clear - A command that clears all entries in the MediMate application.
- Delete - A command that allows users to remove a patient or medical file from the MediMate application.
- Exit - A command that closes the MediMate application.
- FAQ - Stands for Frequently Asked Questions, a section that provides answers to common questions about the MediMate application.
- Find - A command that allows users to locate a patient by name in the MediMate application.
- Help - A command that provides assistance or guidance on how to use the MediMate application.
- List - A command that displays all patients in the MediMate application.
- Mark - A command that allows users to mark an appointment with a patient in the MediMate application.
- Medical certificate - A legal document issued by a medical professional to certify that a patient has been medically evaluated, diagnosed, or treated.
- Medical file - A record of a patient’s medical history, including past illnesses, treatments, and diagnoses.
- Quick Start - A section that provides a brief overview of the MediMate application and its key features.
- Save - A command that allows users to save changes made to patient information or medical files in the MediMate application.
- Search - A command that allows users to search for patients with appointments on a specified date in the MediMate application.
- Show - A command that displays a patient’s information in the MediMate application.
- Tag - A label or marker used to identify and organize patient data in MediMate.
- Upload - A command that allows users to upload a patient’s medical file to the MediMate application.
Features
![]() Notes about the command format:
Notes about the command format:
- When you see words in UPPER_CASE in the MediMate user interface, it means that you need to fill in those words with actual values.
These words in UPPER_CASE are called parameters, and they help MediMate know what information to add or retrieve from the patient records.
e.g. inadd n/NAME,NAMEis a parameter which can be used asadd n/John Doe. - Items in square brackets are optional.
e.gn/NAME [t/TAG]can be used asn/John Doe t/friendor asn/John Doe. - Items with
…after them can be used multiple times including zero times.
e.g.[t/TAG]…can be used ast/friend,t/friend t/familyetc. It is optional field, hence it is not required to fill in. - Parameters can be in any order for add, edit and deletes commands only.
e.g. if the command specifiesn/NAME p/PHONE_NUMBER,p/PHONE_NUMBER n/NAMEis also acceptable. - If a parameter is expected only once in the command, but you specified it multiple times, only the last occurrence of the parameter will be taken.
e.g. if you specifyp/12341234 p/56785678, onlyp/56785678will be taken. - All commands and prefix are case-sensitive unless specified. Invalid cases for command or prefix will result in displaying
Unknown commandorInvalid command format!respectively.
e.g.EDIT 1 ag/50andedit 1 AG/50will not be recognised as a valid command to change the age. The correct format should beedit 1 n/John Doeandedit 1 ag/50. - Extraneous parameters for commands that do not take in parameters (such as
help,list,exitandclear) will be ignored.
e.g. if the command specifieshelp 123, it will be interpreted ashelp.
Help
Format: help
To access the help page in MediMate, simply type help in the command box and press Enter, and click on the URL link.
The help page provides detailed information about the different commands and their usage in the application.
The help page is a great resource for learning how to use MediMate effectively and efficiently.

Add a patient : add
Adds a patient to Medimate through command method:
Format: add n/NAME p/PHONE_NUMBER e/EMAIL a/ADDRESS [ag/AGE] [m/MEDICAL_CONDITION] [nric/NRIC_NUMBER] [t/TAG]…
- MANDATORY: You must add the patient’s name, phone number, email, and address to successfully add the patient into MediMate.
- OPTIONAL: You can also add patient’s age, medical condition, Nric.
- Refer to Restriction on Add and Edit below on the
addfunction restriction.
Examples:
-
add n/John Doe p/98765432 e/johnd@example.com a/John street, block 123, #01-01This contains strictly required information to identify a patient. -
add n/Betsy Crowe t/friend e/betsycrowe@example.com a/Newgate Prison
  p/1234567 ag/12 m/cough nric/S9935010Y t/criminal
This contains more information relevant to that patient. -
add n/John Doe p/98765432 e/johnd@example.com A/John street, block 123, #01-01This demonstrates how using an invalid prefix can cause the add command to fail or produce unexpected results.
Adds a patient to MediMate through button method:
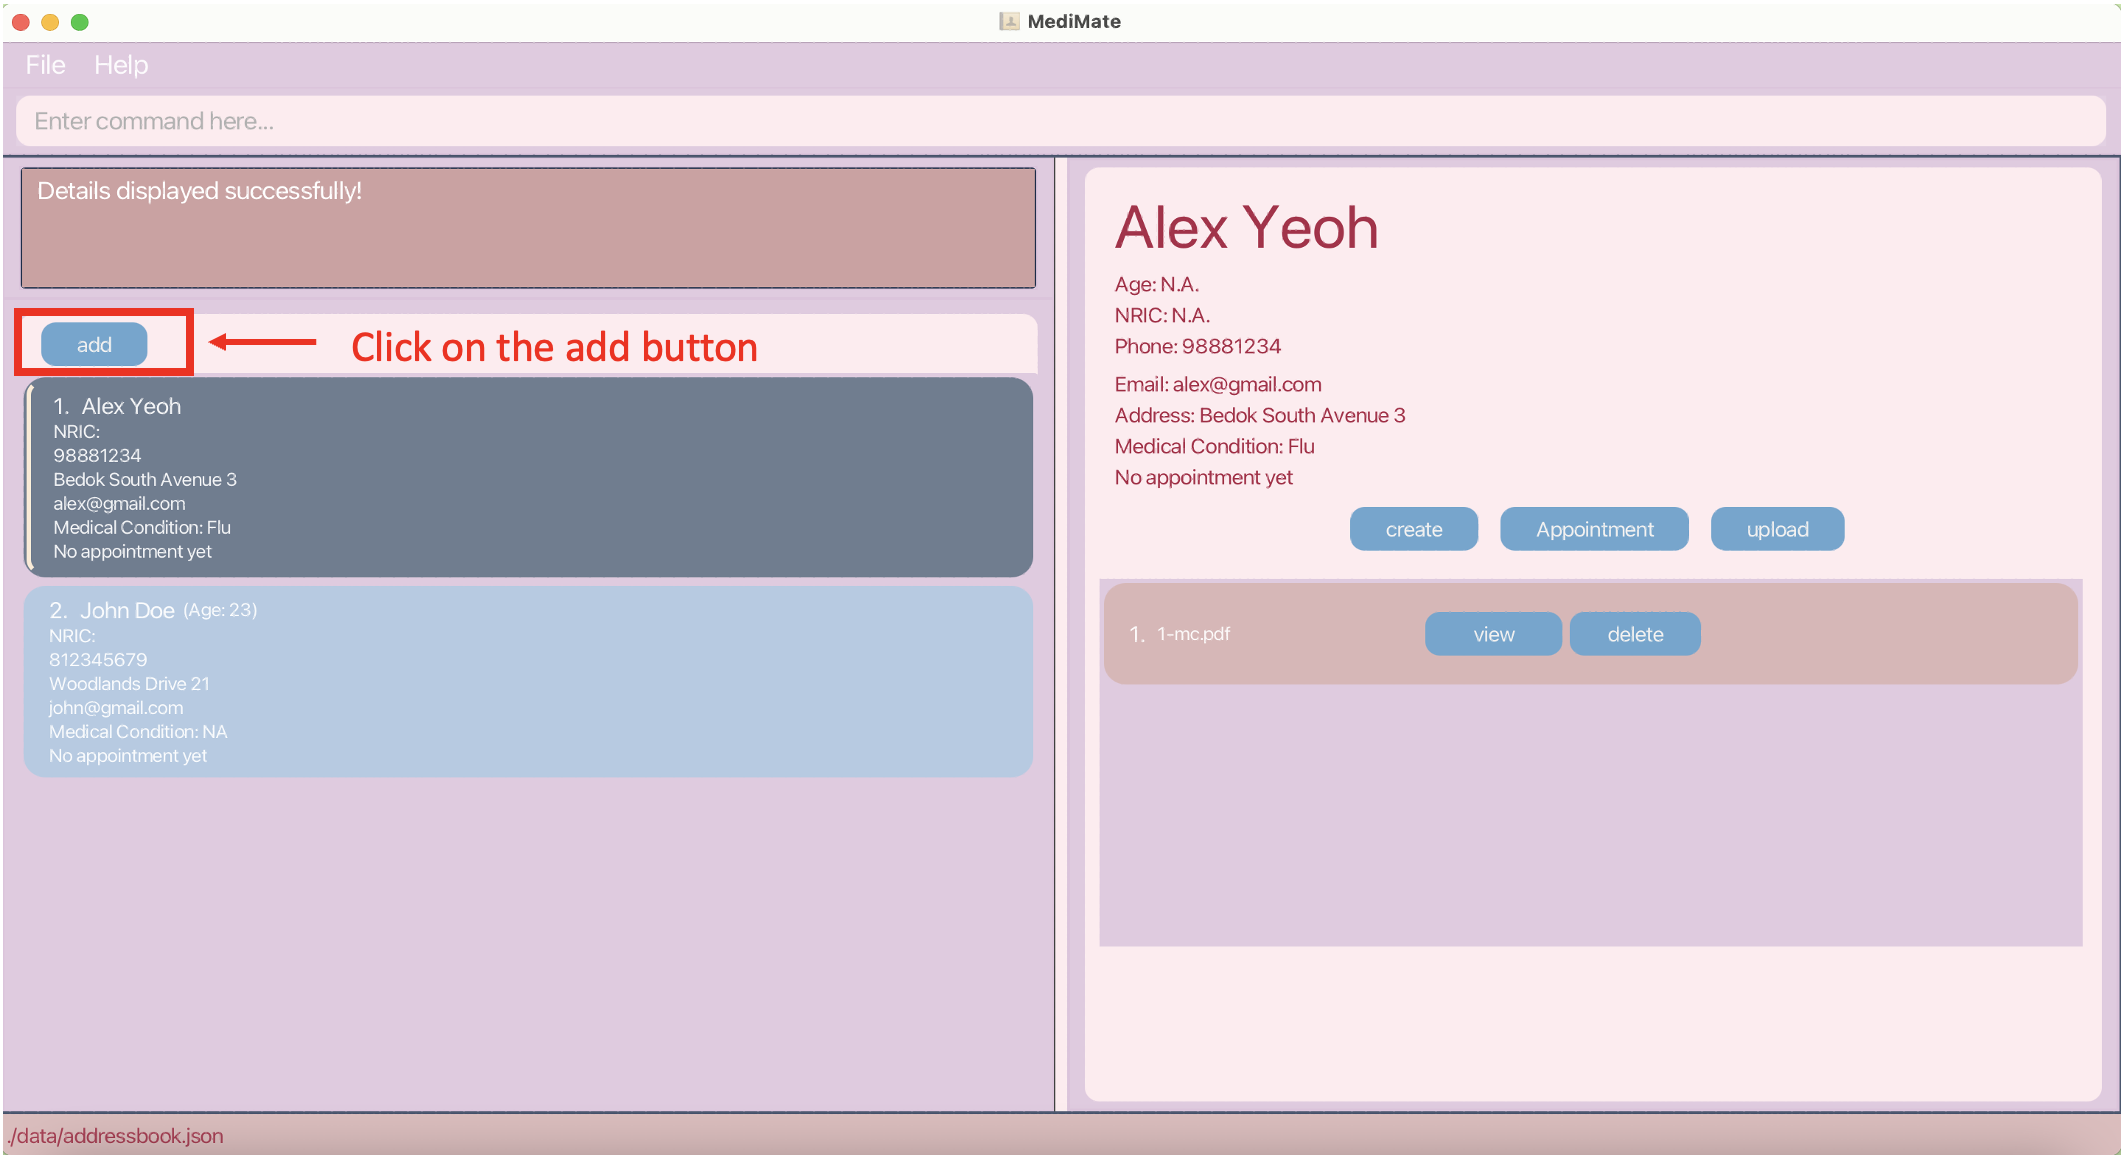
- Click the add button as shown in the screenshot above.
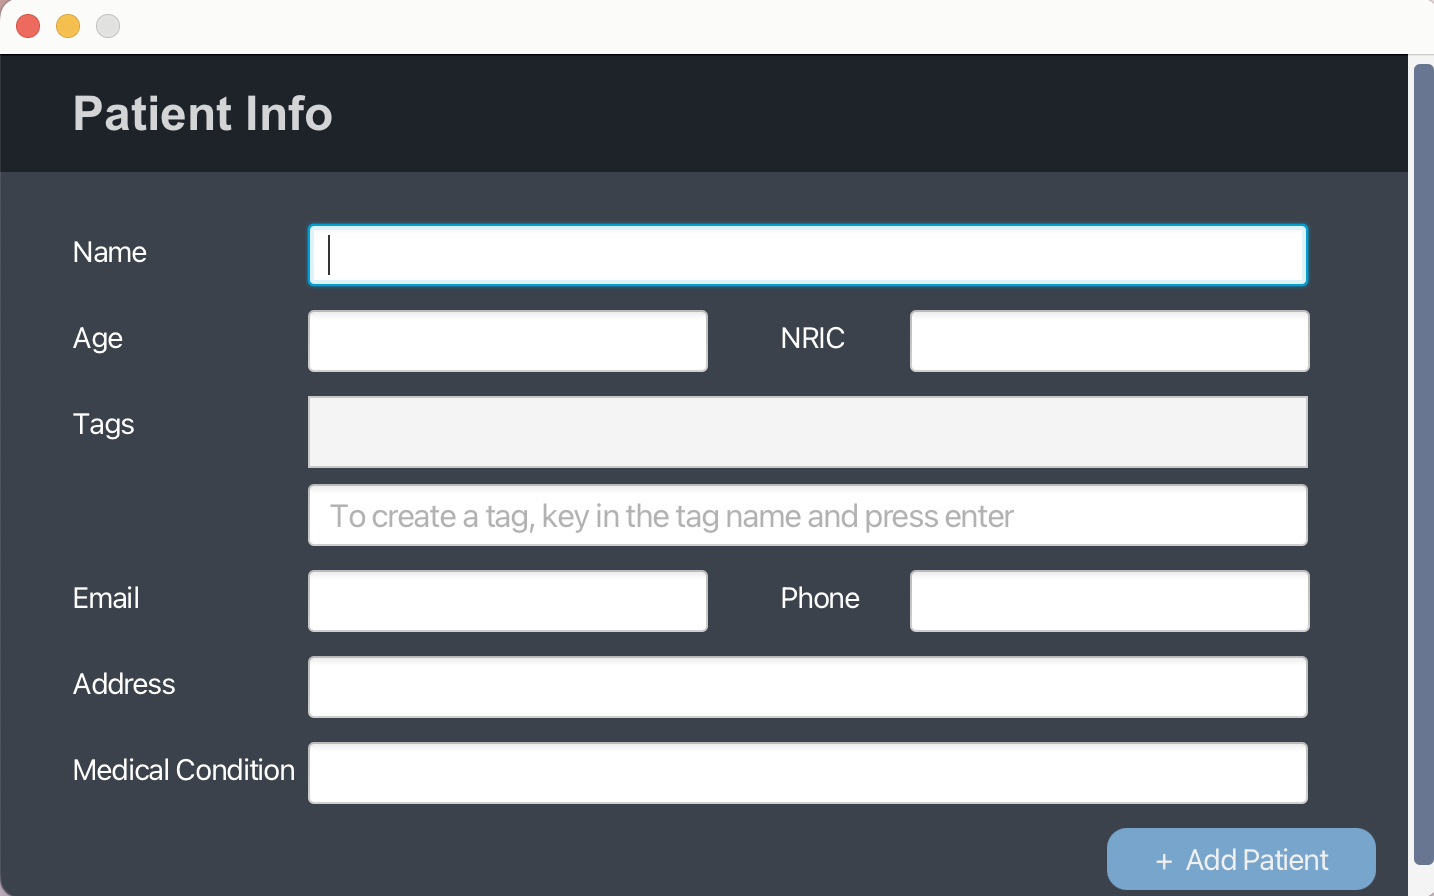
- After clicking on the Add button, a popup window will appear where you can enter the patient’s details. After filling in, click on the + ADD PATIENT button to successfully add the patient. The patient’s details will be saved in MediMate, and you can view them later in the patient list.
Listing all patients : list
Shows a list of all patients in MediMate.
Format: list
Listing patients in alphabetical order : list_name
Format: list_name
Shows a list of all patients in MediMate by their name in alphabetical order.
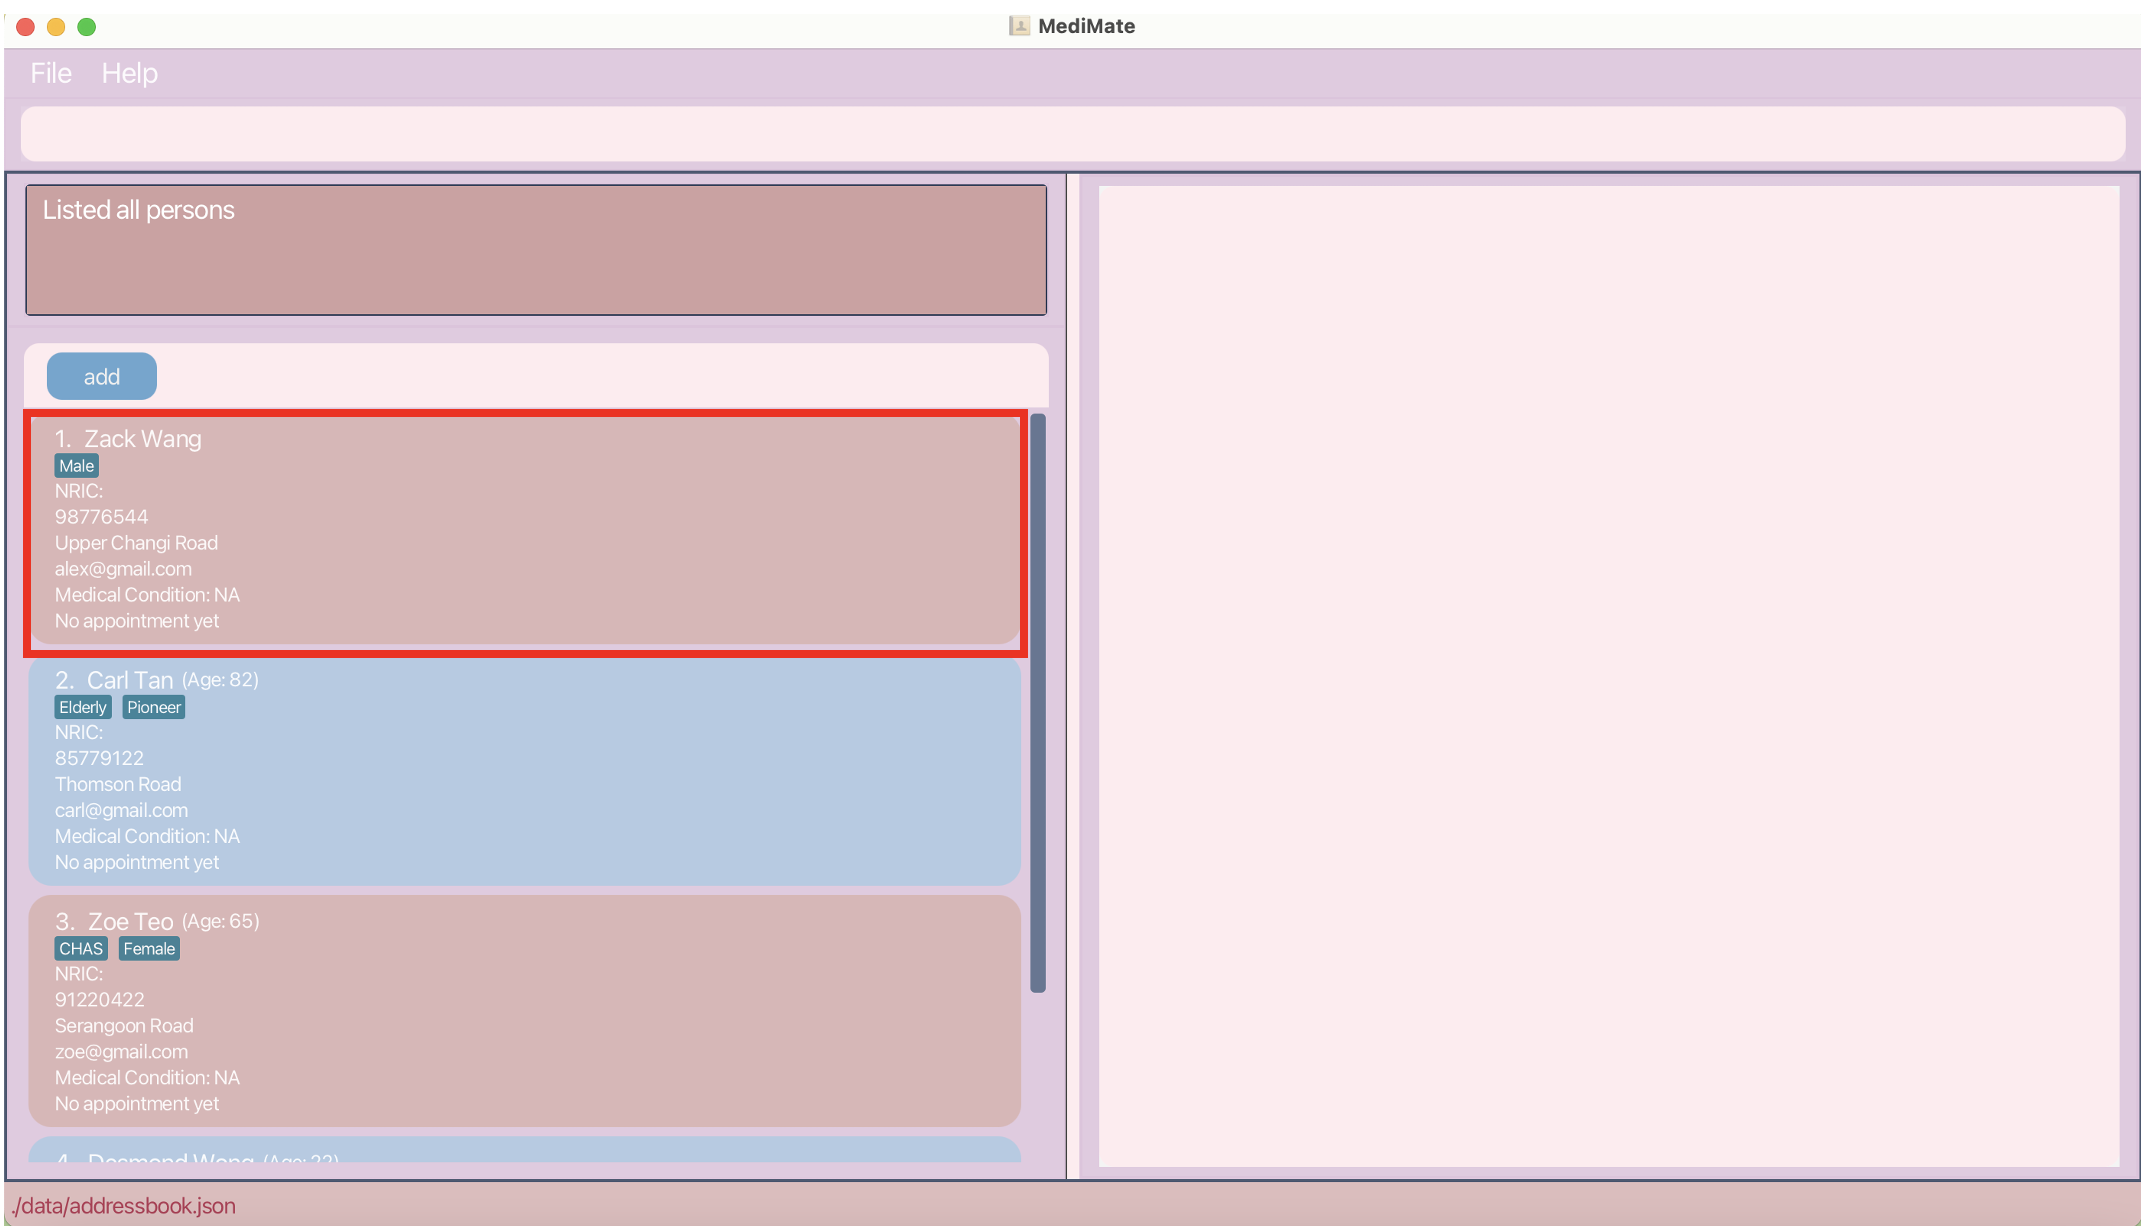
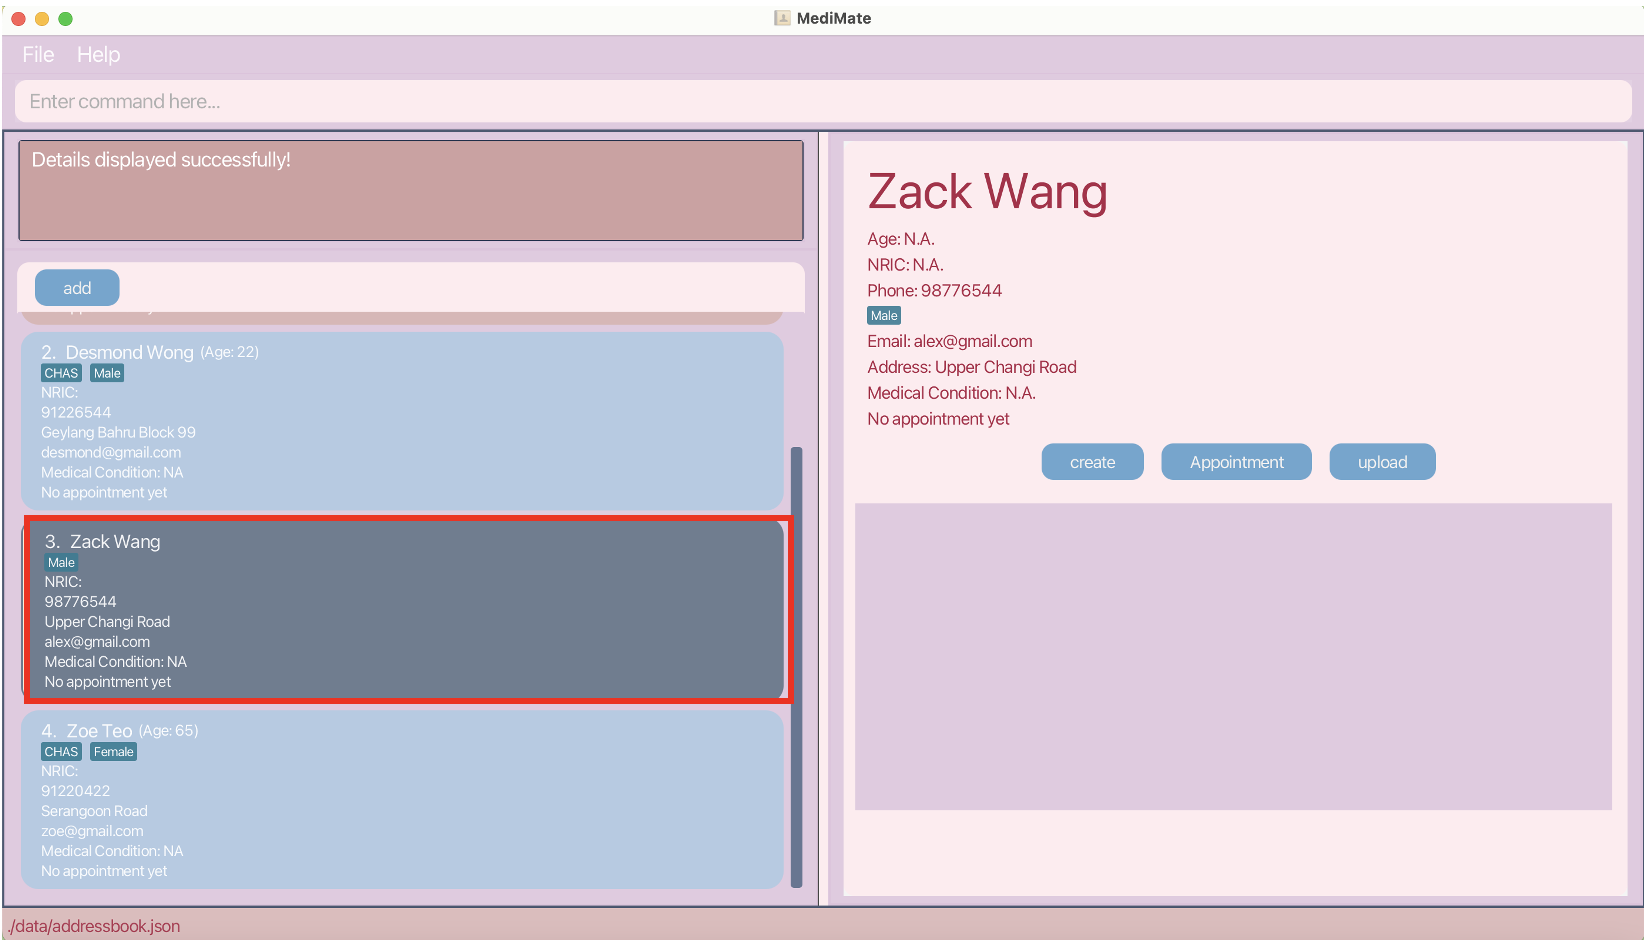
- As shown in the screenshot below, once
list_namecommand is entered, Zoe moved from the first index to the third index, as Zack is arranged according to alphabetical order.
Show a patient’s information: show
Format: show INEX
Shows the patient’s information at the right panel.
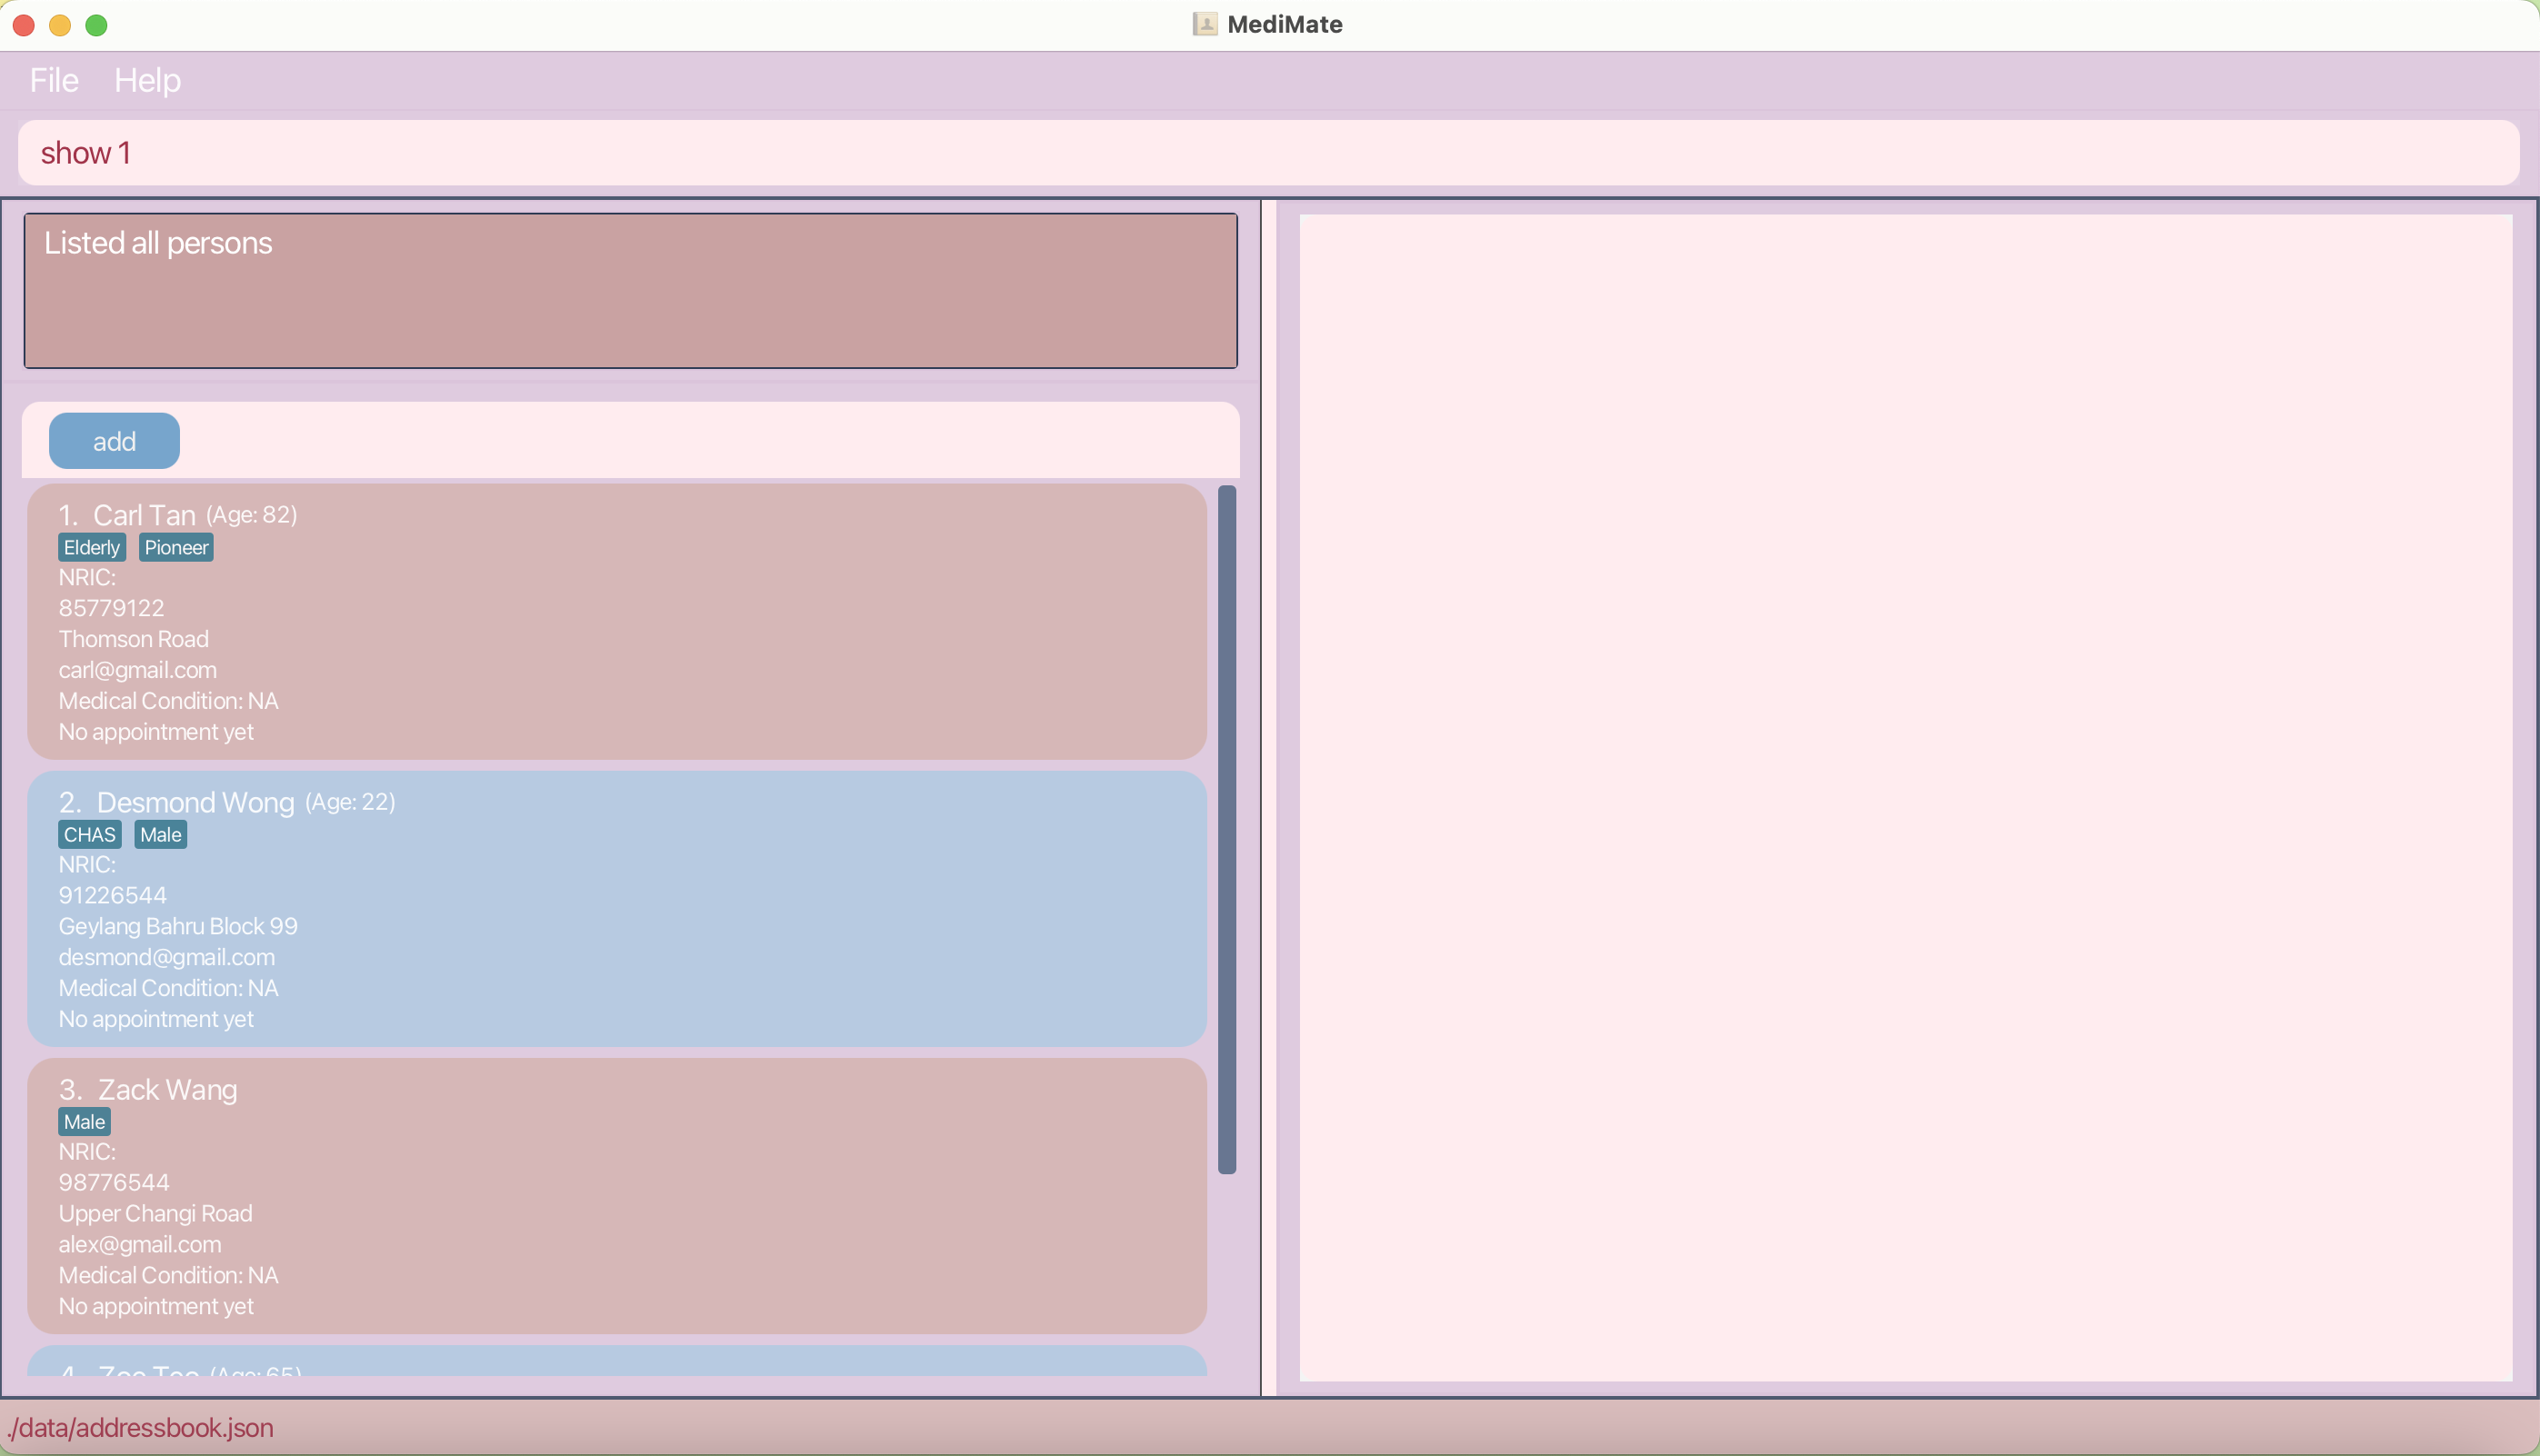
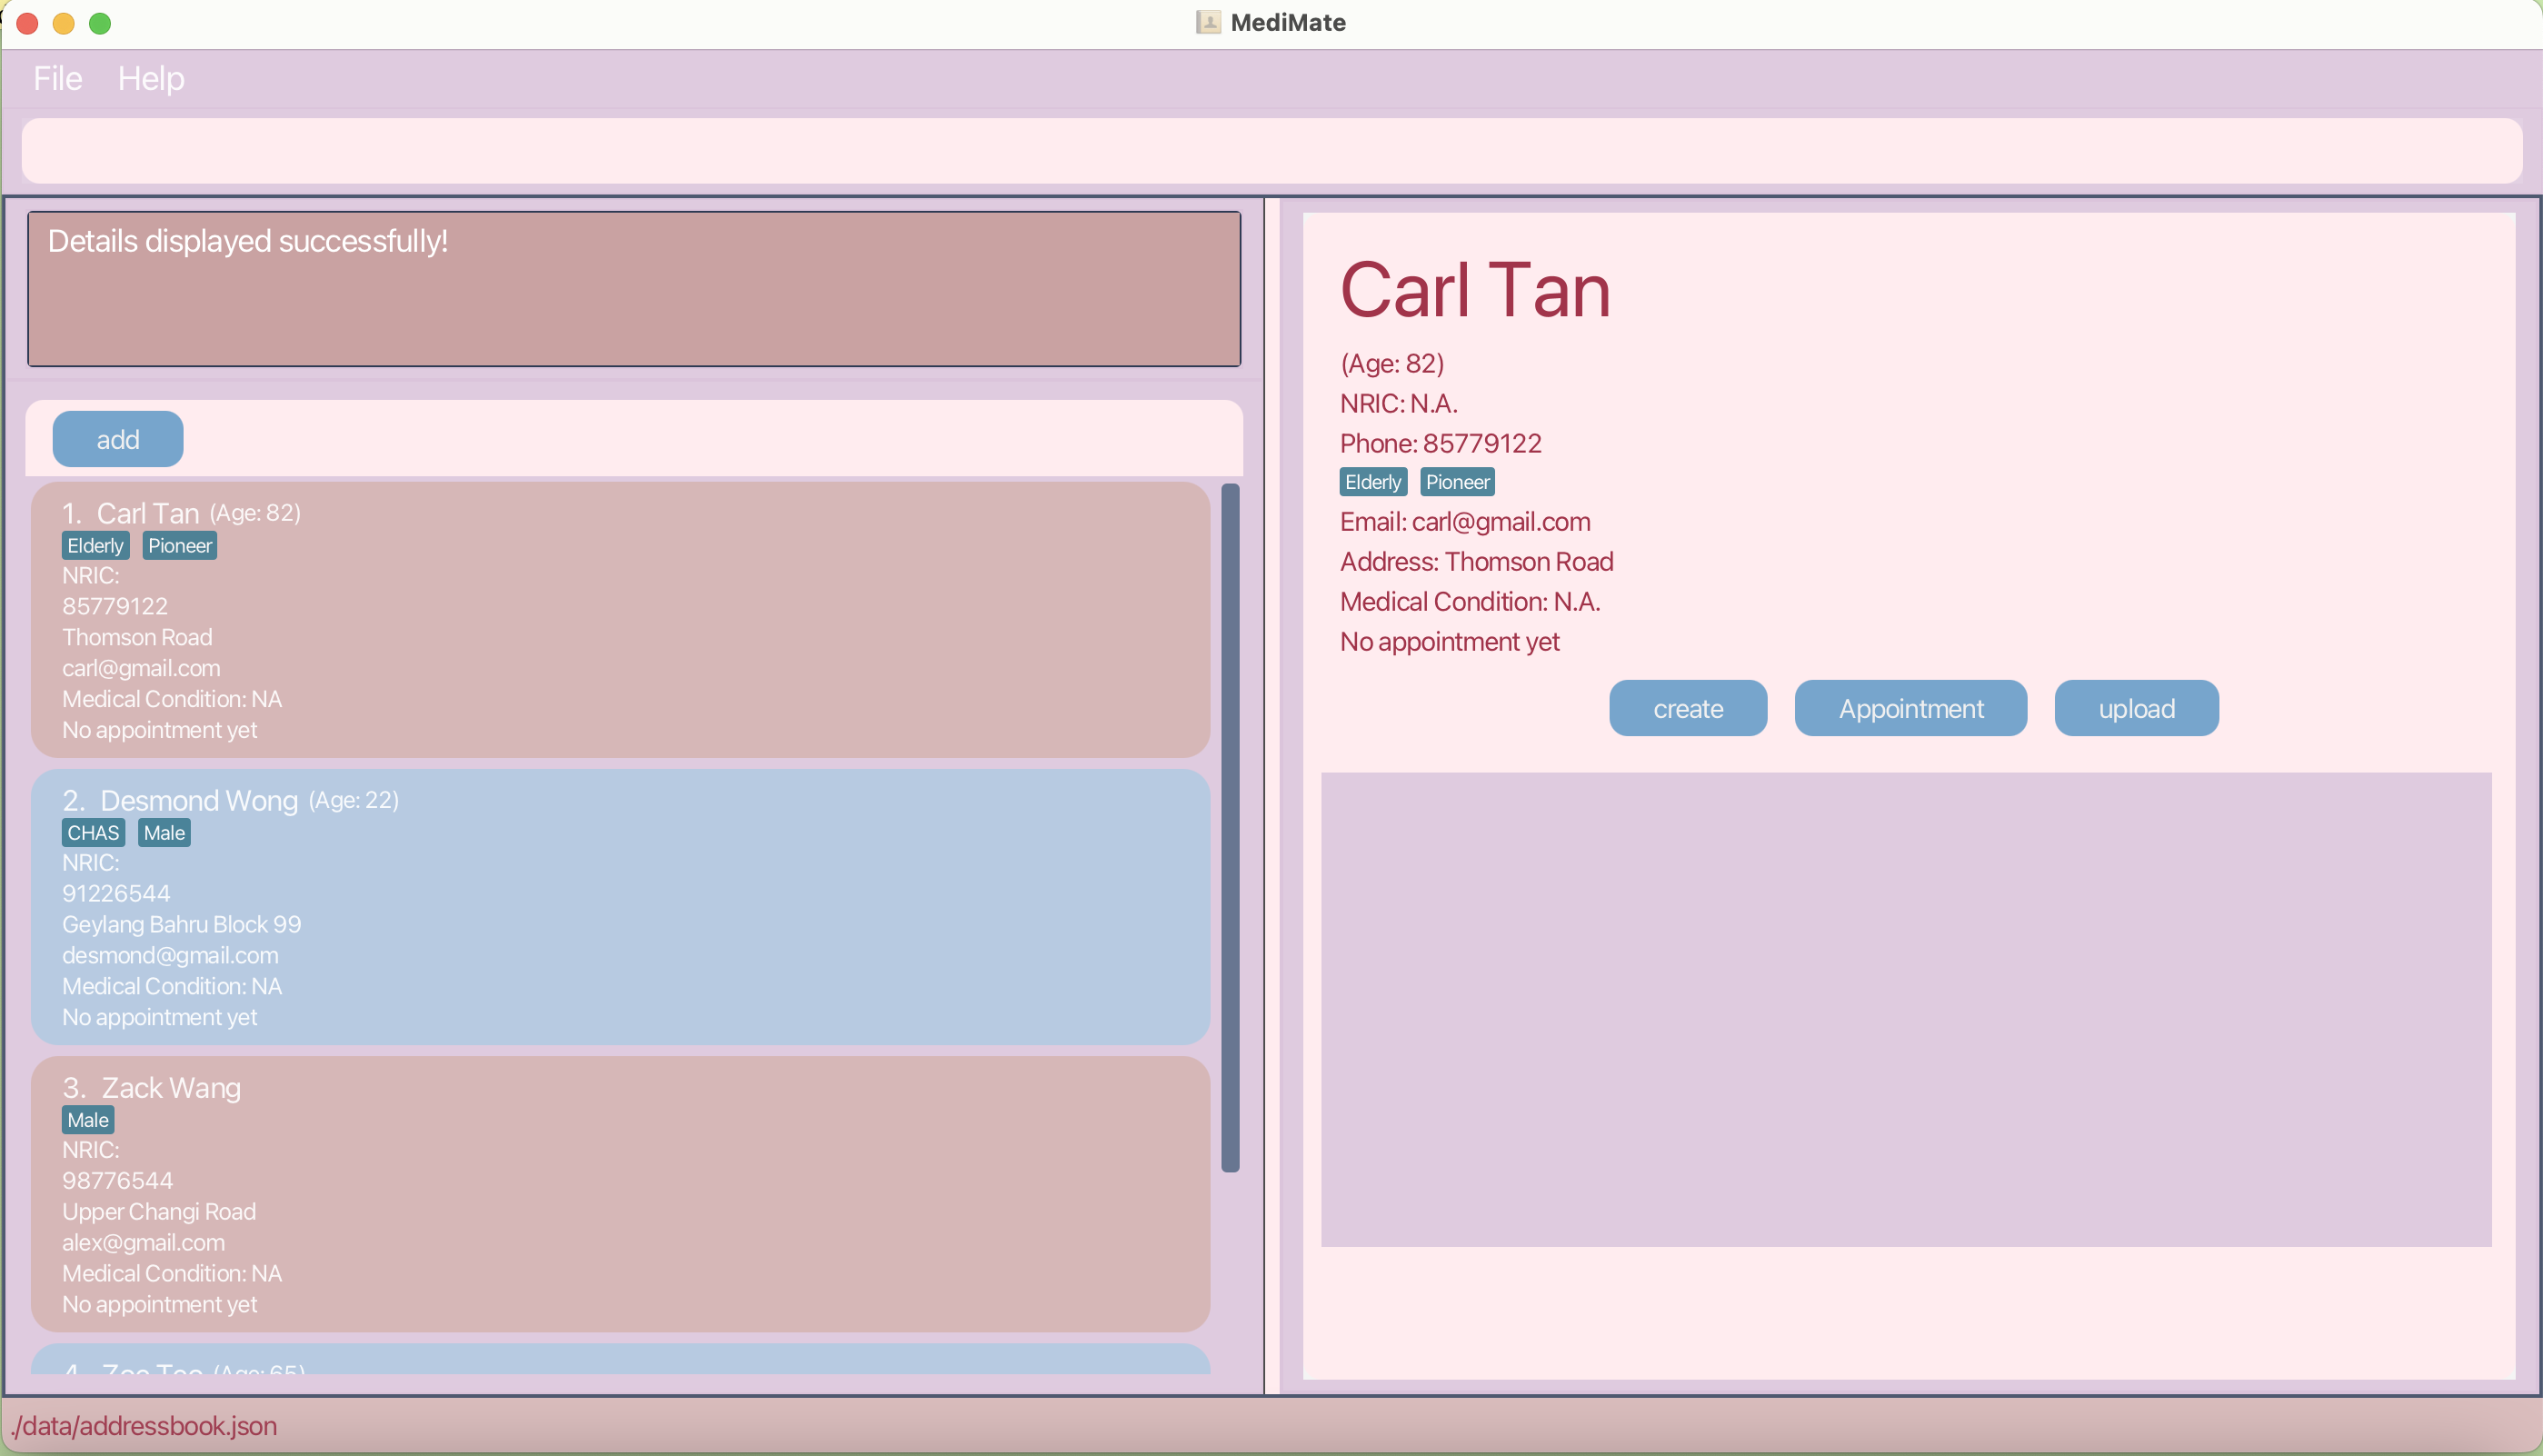
E.g. show 1 will display the patient information at the right panel
Editing a patient : edit
Edits an existing patient in the patient list:
Format: edit INDEX [n/NAME] [p/PHONE] [e/EMAIL] [a/ADDRESS] [ag/AGE] [m/MEDICAL_CONDITION] [nric/NRIC_NUMBER] [t/TAG]…
- Edits the patient at the specified
INDEX. The index refers to the index number shown in the displayed patient list. The index must be a positive whole number 1, 2, 3, … - Specify the field you want to edit (name, phone, email, address, age, medical condition, nric, or tag) followed by the new value. At least one of the optional fields must be provided.
- Existing values will be updated to your input values.
- When editing tags, the existing tags of the patient will be removed. (i.e adding of tags is not cumulative.)
- Refer to Restriction on Add and Edit below on the
editfunction restriction.
t/ or m/ without specifying any tags or medication condition after it.
Examples:
-
edit 1 p/91234567 e/johndoe@example.com t/CHASEdits the phone number and email address of the 1st patient to be91234567,johndoe@example.comandCHASrespectively. (Note: Existing tag(s) will be removed) -
edit 2 n/Betsy Crower t/Edits the name of the 2nd patient to beBetsy Crowerand clears all existing tags. -
edit 3 ag/1222This command is not allowed as age should be less than or equal to 120 and must be a positive whole number. -
edit 1 ag/50 A/John streetThis command is not allowed as it has invalid prefix. -
edit 1 nric/SS92433ABcommand is permissible. However, it is important for the user to carefully verify the NRIC that has been inputted to ensure its accuracy.
Appointment
- It’s important for a user to stick with their chosen appointment-making method, whether it’s the command or button method, throughout the entire process. Switching between methods can lead to unexpected results that may not meet their desired outcome.
Making Appointment to a patient : makeApp
Make an appointment to Medimate through command method:
Format: makeApp INDEX /from {startTime} /to {endTime}
- Makes/Reschedule an appointment with a patient at the specified
INDEX. The index refers to the index number shown in the displayed patient list. The index must be a positive whole number 1, 2, 3, … - startTime and endTime should be on the same date, and in 24-hour clock format.
- startTime has to be earlier than the endTime else appointment will not be created.
- If your patient already had an appointment, it will reschedule this appointment
- Appointment will not be created if the timing clash with the doctor’s existing appointment timing
Examples:
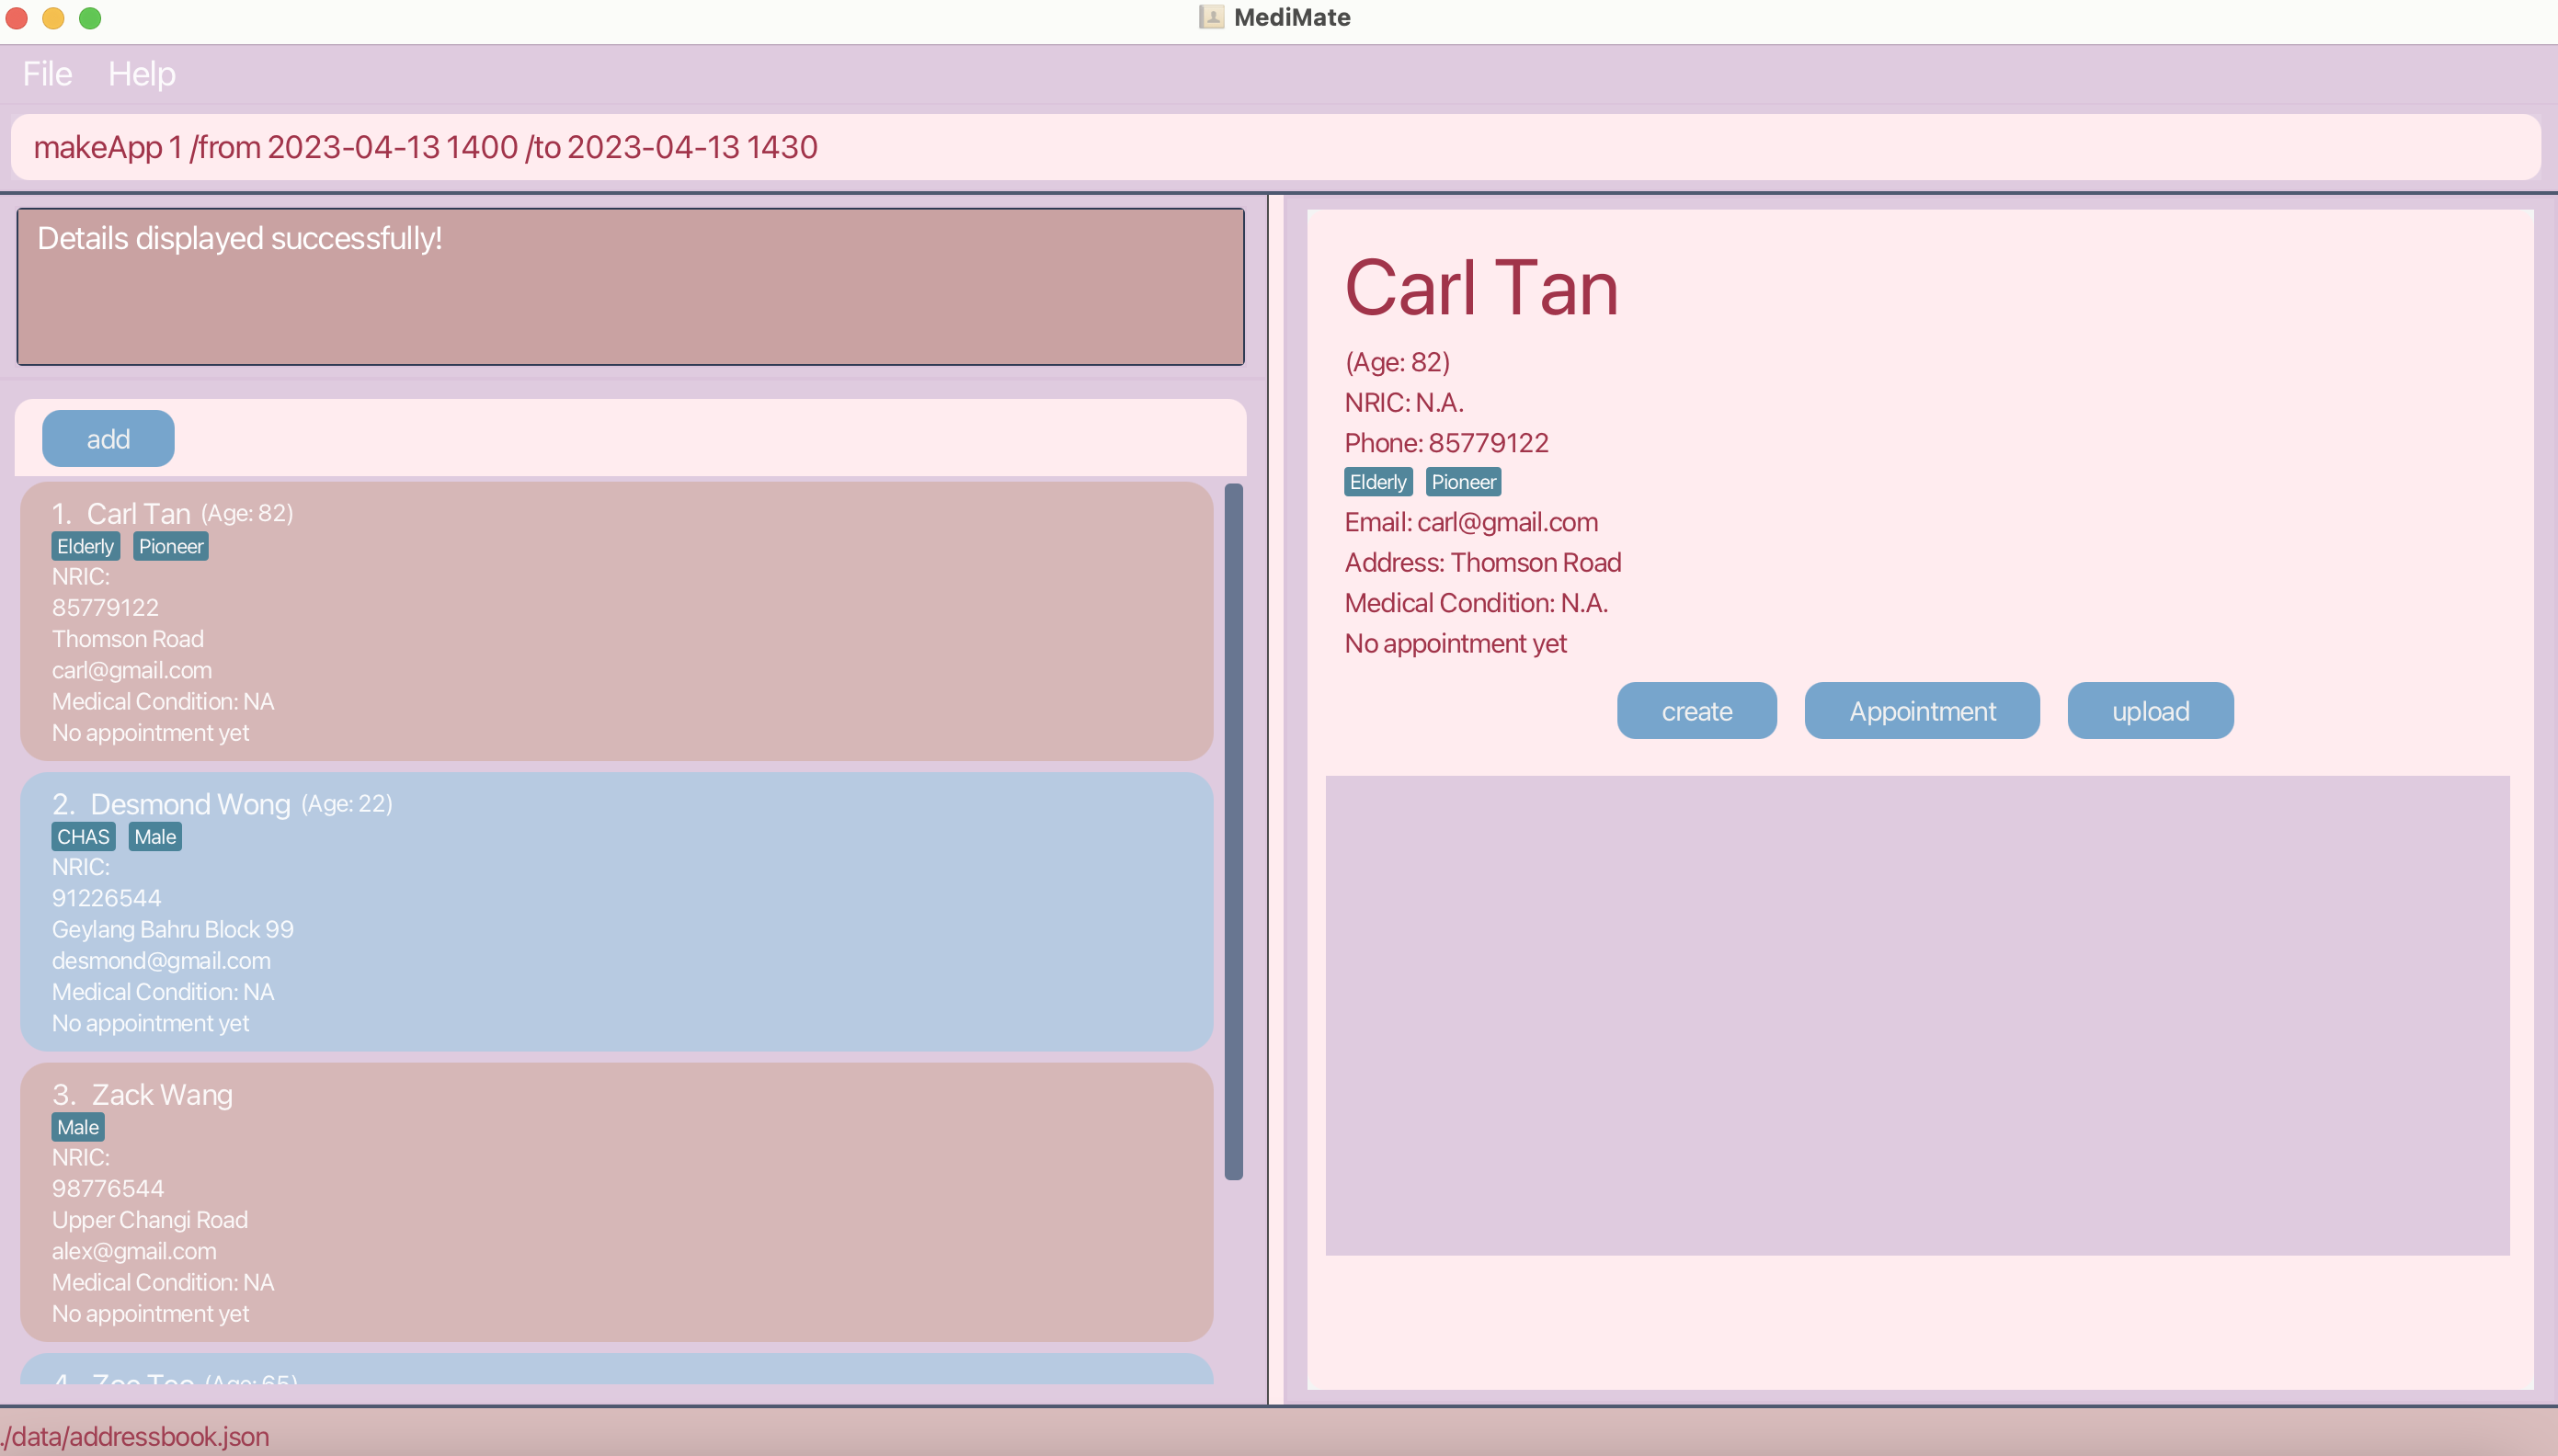
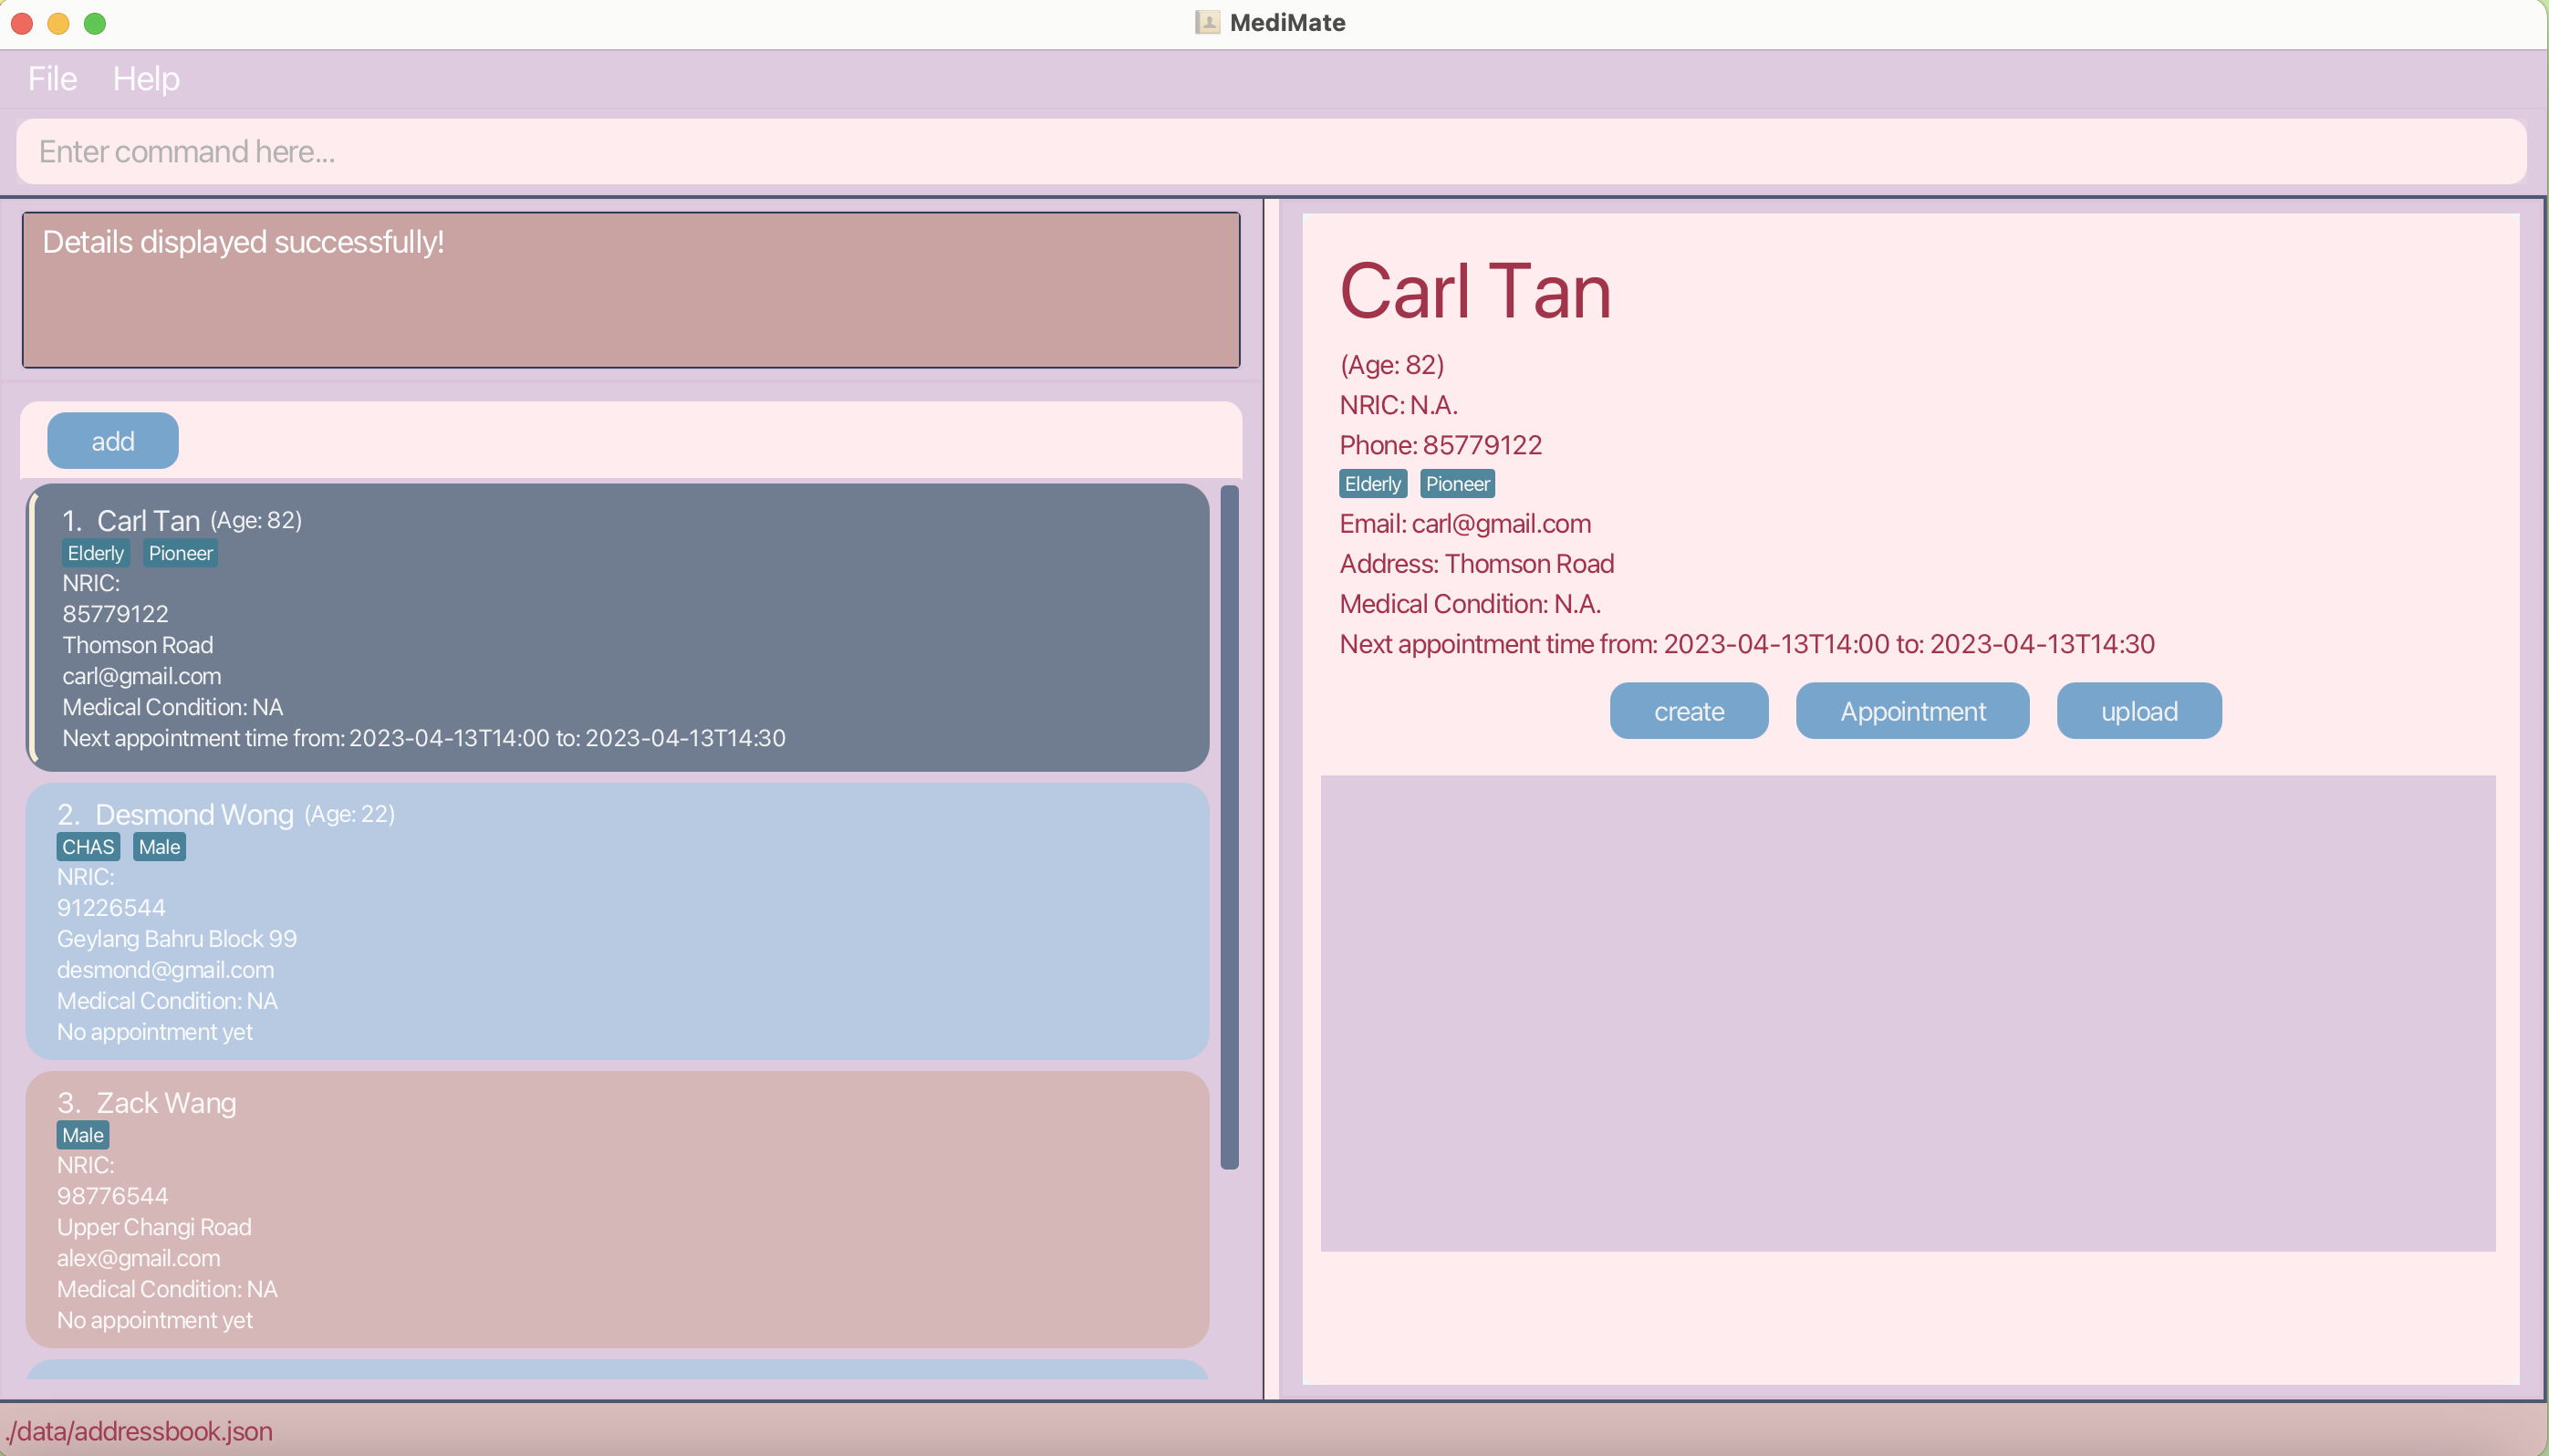
-
makeApp 1 /from 2023-04-13 1400 /to 2023-04-13 1430Makes an Appointment with 1st patient, starting from 14:00 to 14:30 on 2023-04-13. - The time is in the format of
2023-04-13T14:00, where2023-04-13stands for the appointment date andT14:00stands for the time in 24-hour clock format.
Make an appointment to MediMate through button method:
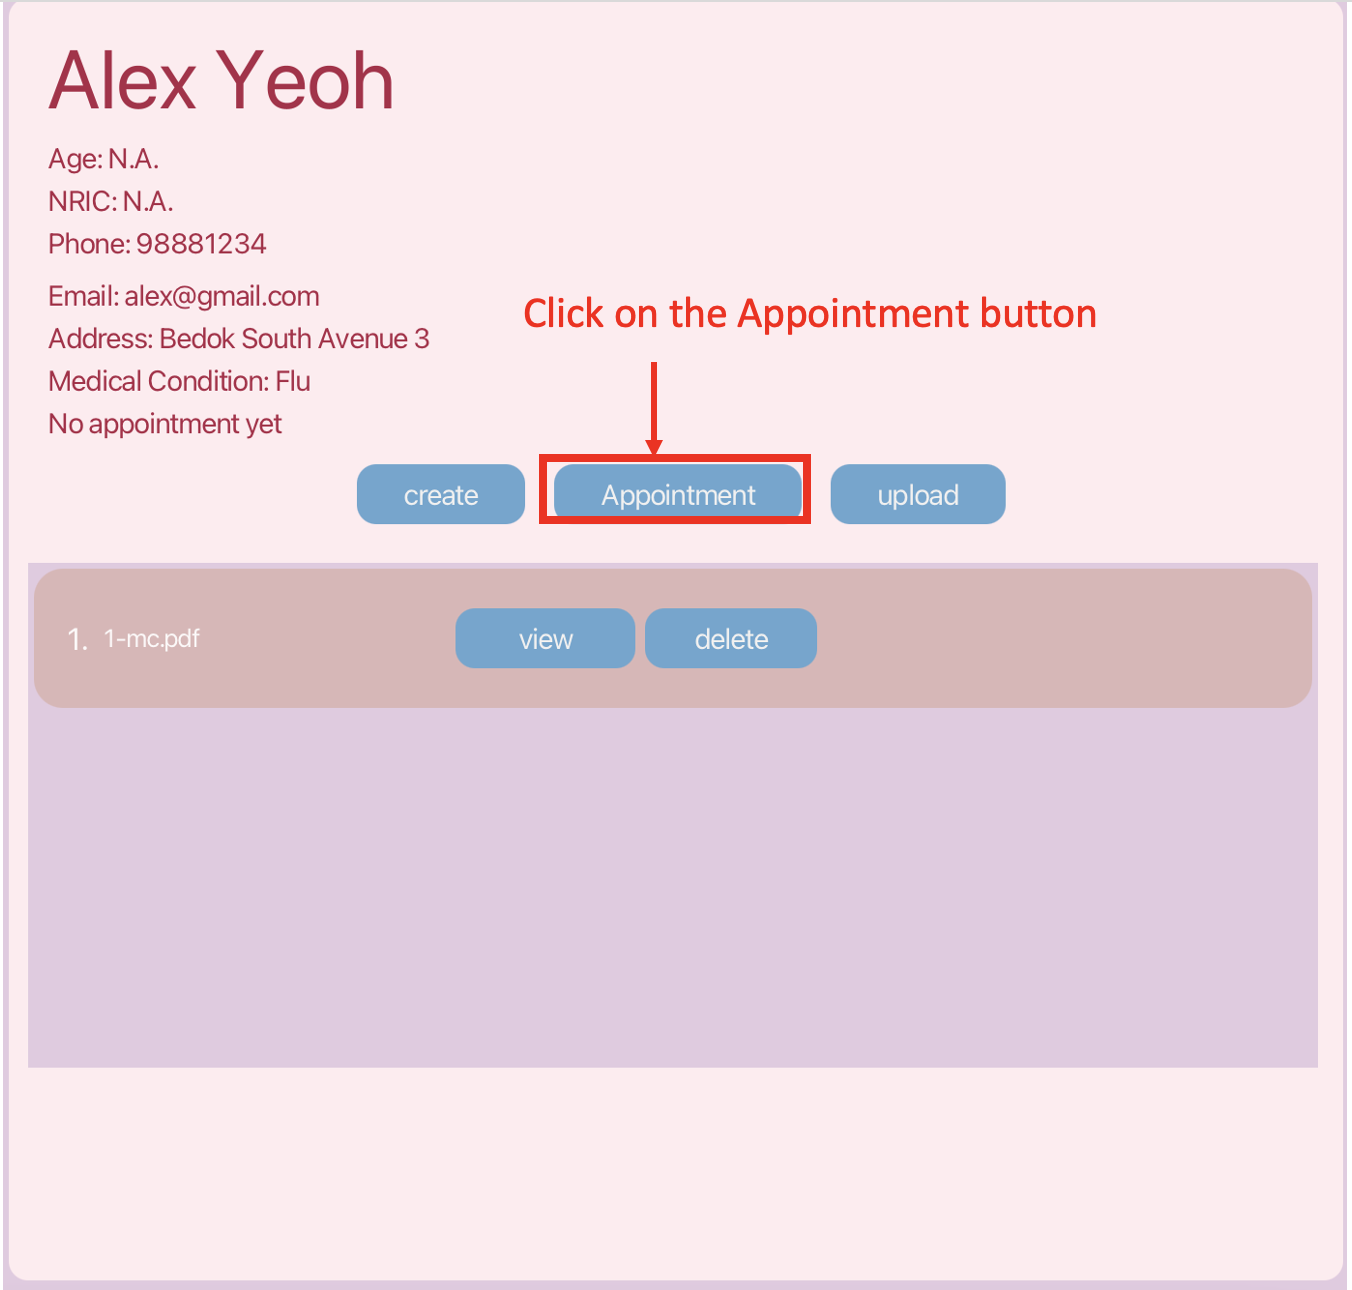
- Click on the Appointment Button as shown in the above screenshot.
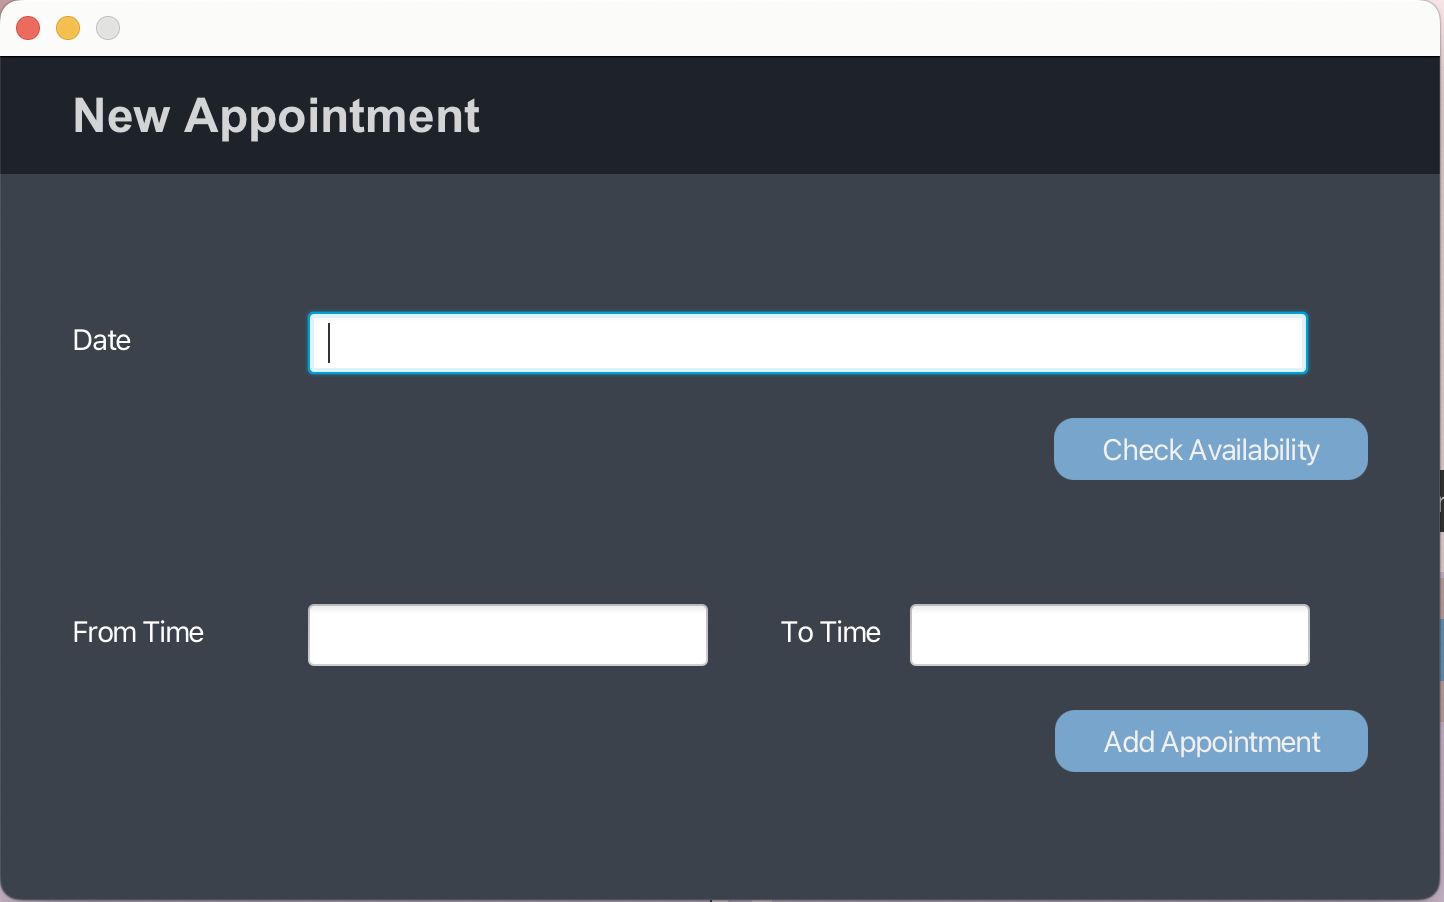
- A popup window will appear, as shown in the screenshot above. If you use the Check Availability button with a specific date, it will display a list of patients who have appointments scheduled for that day.
- 💡Date must be in YYYY-MM-DD format and Time must be in the format of 24hr clock (HHmm).
- 💡Once the appointment button is clicked, you should not click the patient’s card again, else the appointment made will be assigned to the latest patient’s card clicked.
Marking Appointment with a patient: markApp
Marks an appointment with a patient as done using command method:
Format: markApp INDEX
- Marks an appointment with a patient at the specified
INDEX. The index refers to the index number shown in the displayed patient list. The index must be a positive whole number 1, 2, 3, … - Once marked, your patient’s appointment will be empty.
- Before you can mark an appointment as completed, make sure the patient has a scheduled appointment in the first place.
Examples:
-
markApp 3Marks an appointment with 3rd patient as done.
Create a Medical Certificate for patient: create
Create a PDF Medical Certificate for a patient using command:
Format: create INDEX doc/DOCTOR_NAME [m/MEDICAL_CONDITION] d/DAYS
- Create a PDF medical certificate for a patient at the specified
INDEX. The index refers to the index number shown in the displayed patient list. The index must be a positive whole number 1,2,3 … - Days representing the number of days of unfit, and it must be positive whole number 1,2,3 …
- The maximum allowed days is 60. Hence, any days more than 60 is regards as invalid.
- Medical condition is optional for command method.
Examples:
-
create 1 doc/John m/Flu d/5Creates a 5 days Medical Certificate for the 1st patient in PDF format, with medication condition of flu.
Create a PDF Medical Certificate for a patient button method:
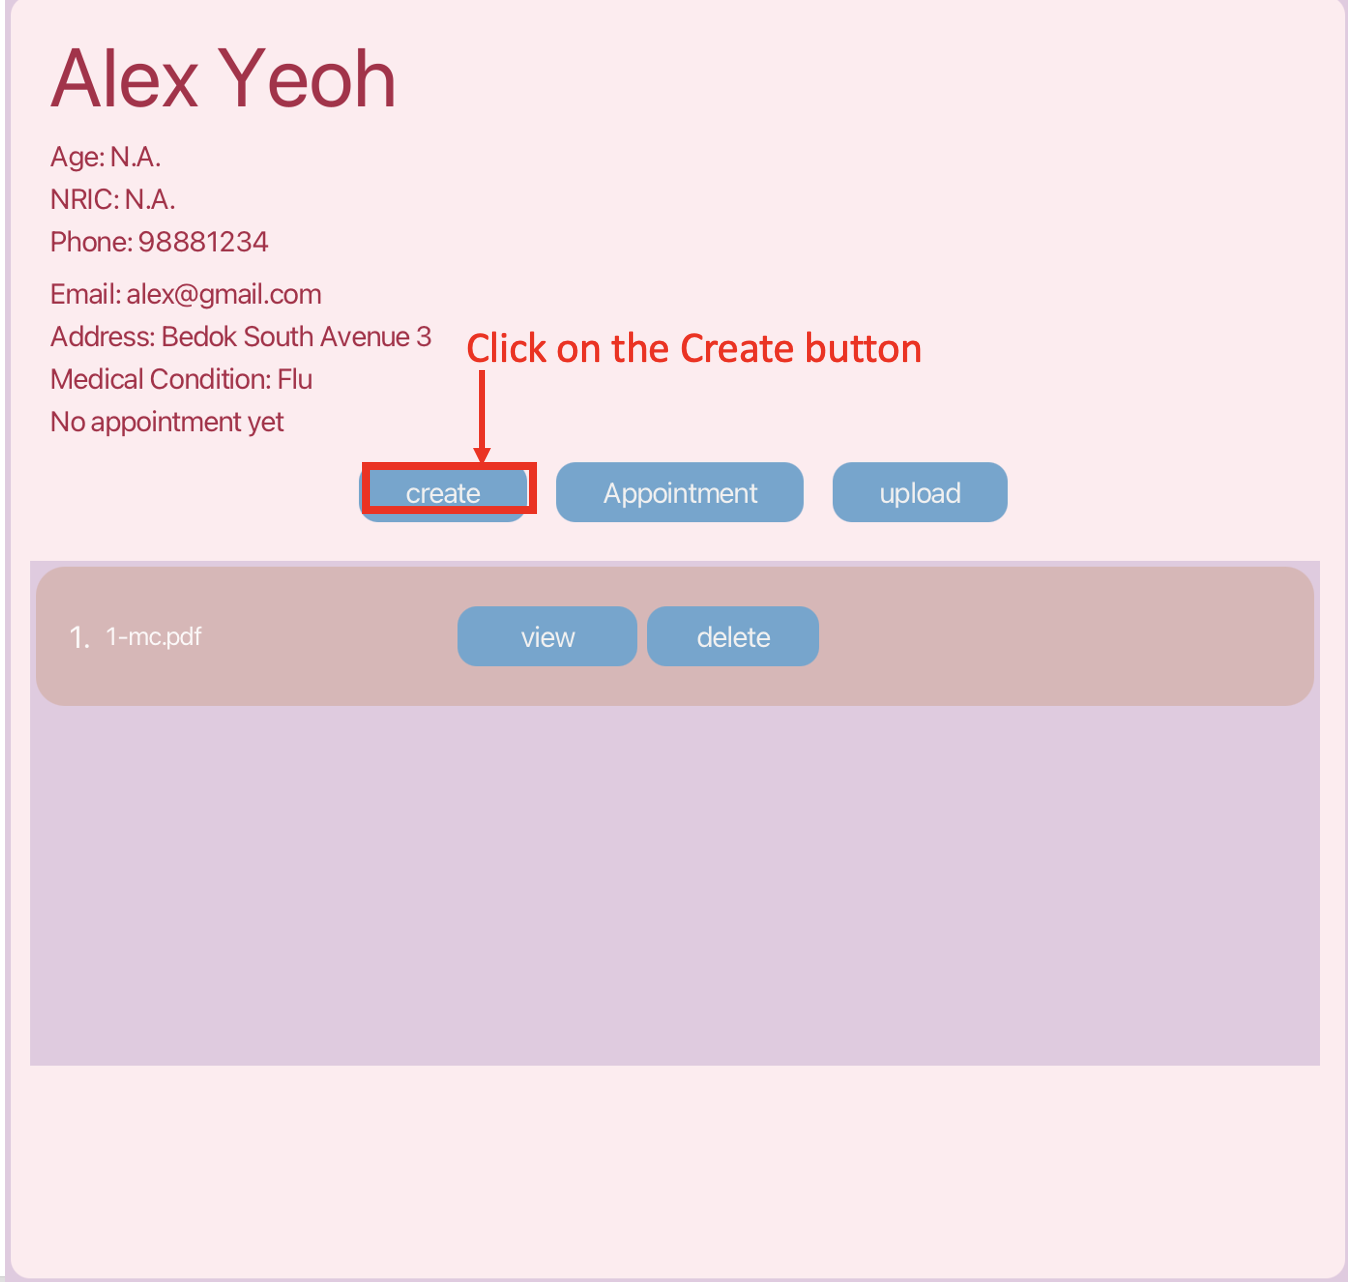
- Click on the Create button as shown in the screenshot above.
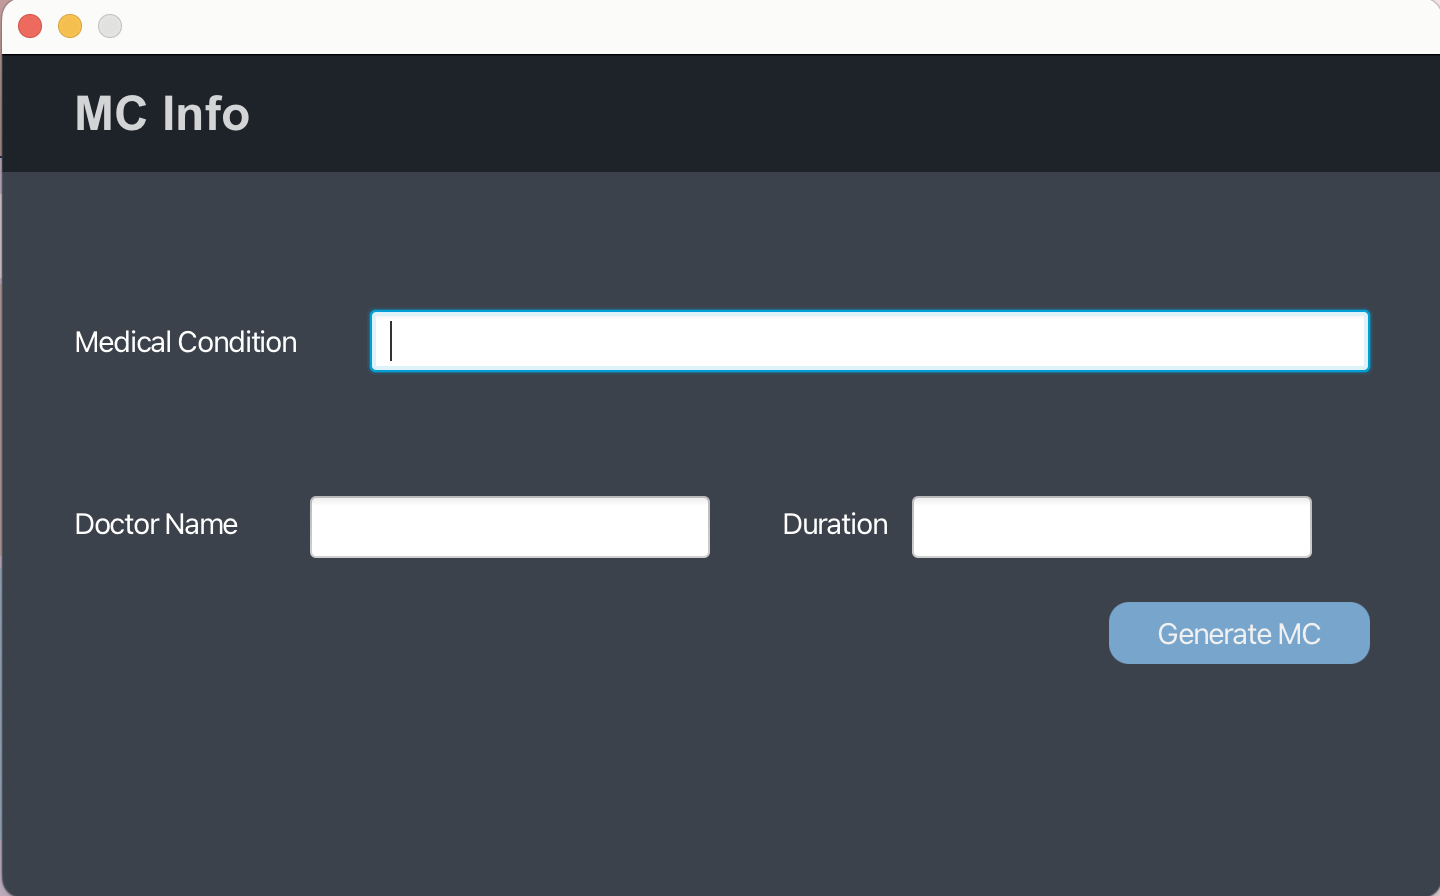
- A popup window appear, as shown in the screenshot above. You need to fill in all the blanks namely: Medical Condition, Doctor Name, and Duration (Number of days) and click Generate MC. Now, you have successfully generated a MC.
View the Medical File of a patient: view
View a PDF Medical Certificate for a patient using command:
Format: view INDEX {FILE INDEX}
- View the medical report or relevant file of a patient at the specified
INDEX. The index refers to the index number shown in the displayed patient list. The index must be a positive whole number 1,2,3 … - Once selected, the chosen medical report will pop up in another window allowing you to view.
-
FILE INDEXrefers to the index number shown in your patient’s panel, containing a list of relevant patient’s file. The file index must be a positive whole number 1,2,3 … - If the specified INDEX patient does not have a medical report, you will not be able to view the report as it does not exists.
Examples:
-
view 1 1View the 1st medical file of the 1st patient.
View a PDF Medical Certificate for a patient using button:
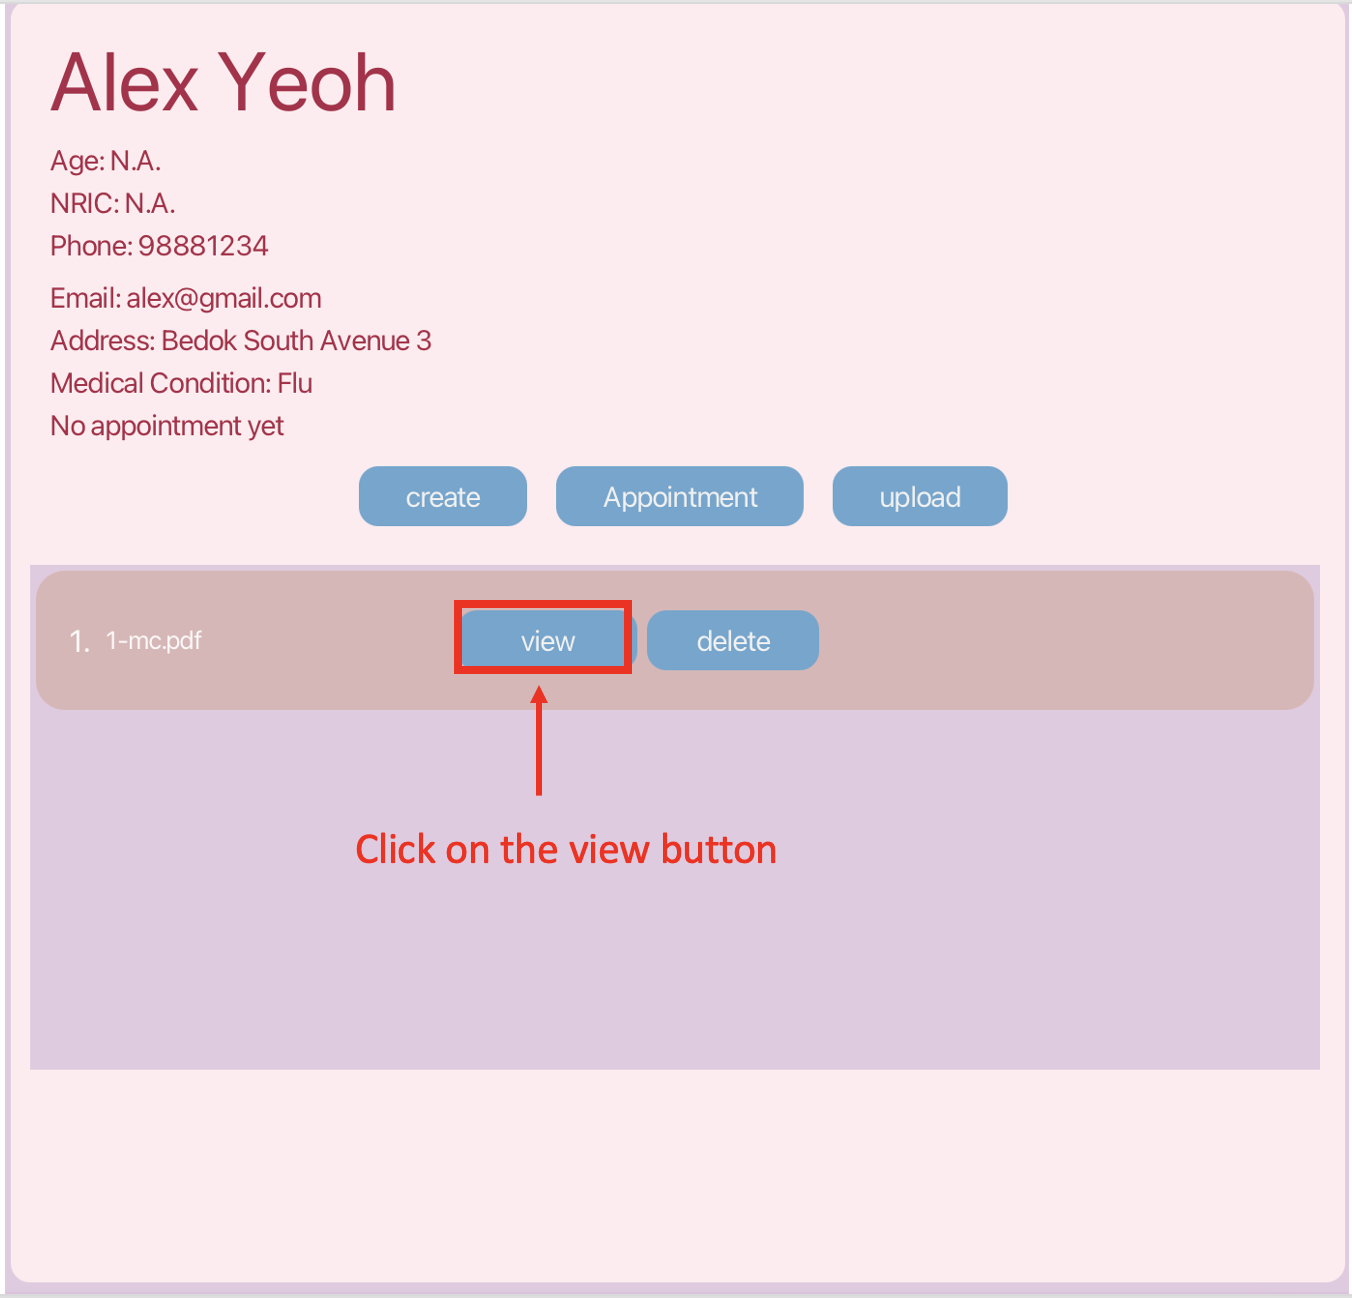
- Click on the View button as shown in the screenshot above.
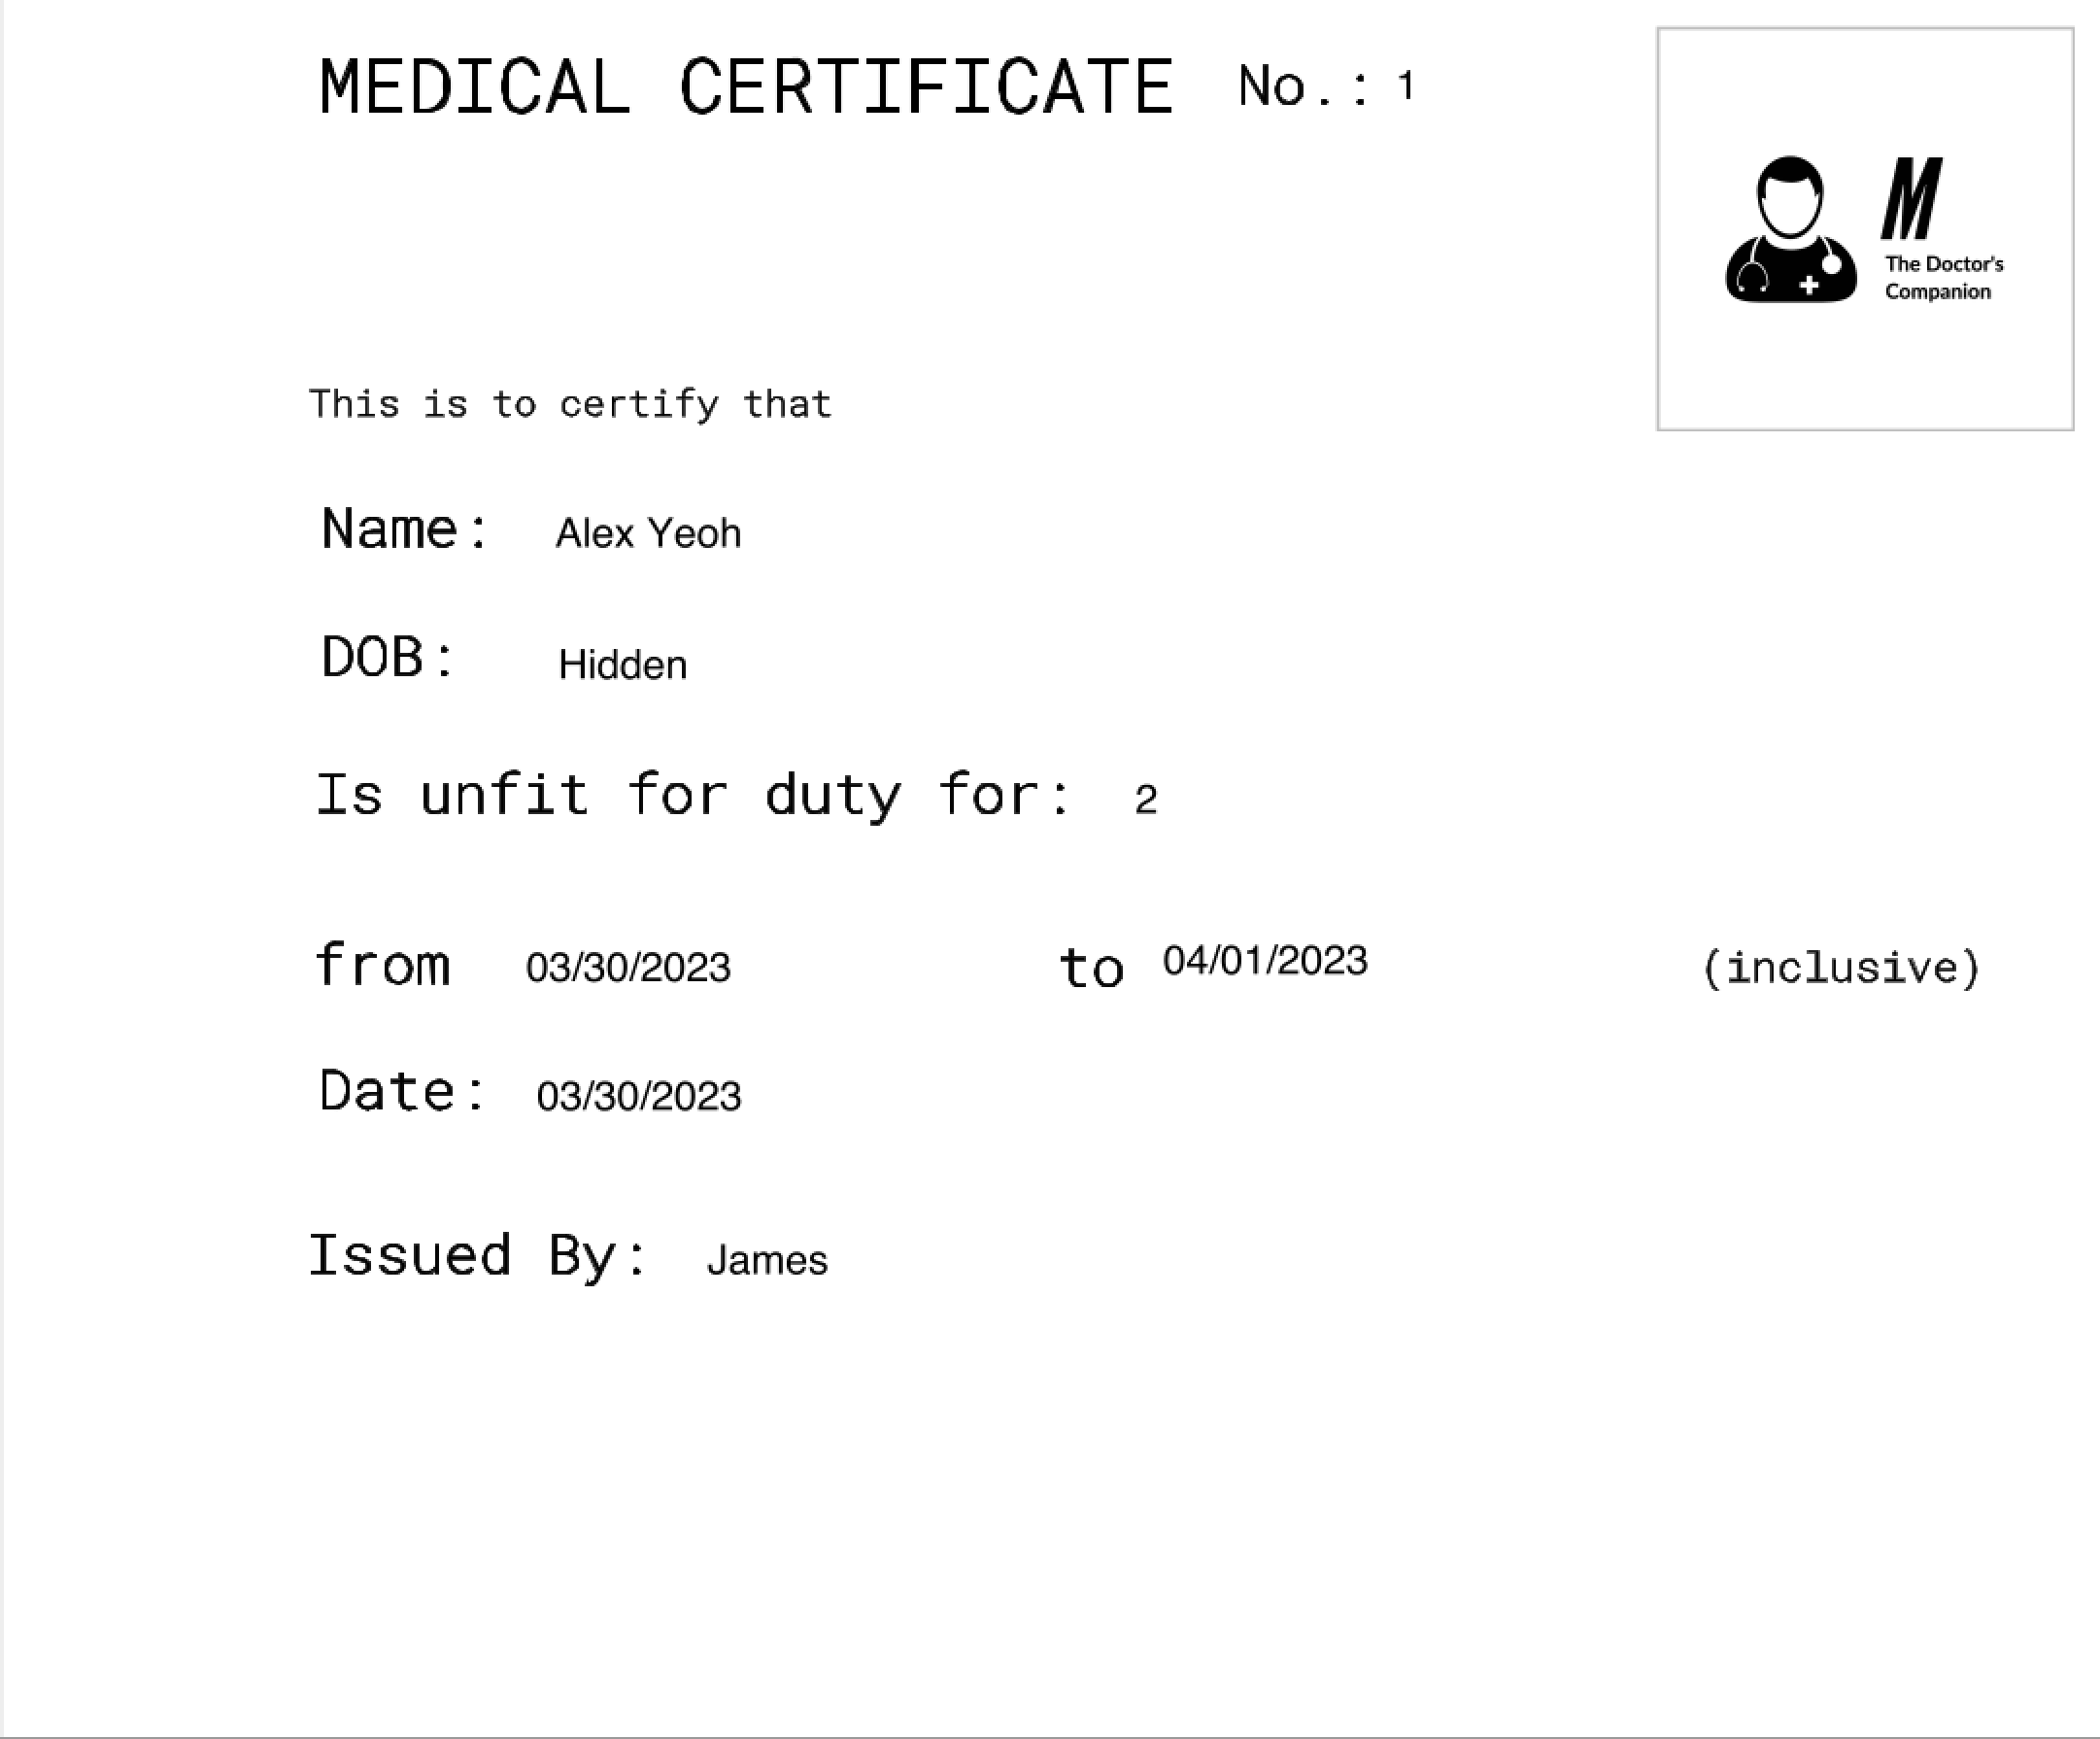
- The selected medical will pop up, a sample medical file is shown in the screenshot above.
Upload a patient’s medical file: upload
Upload Medical File of a patient’s through command:
Format: upload INDEX
Upload the medical file. File must be in either in pdf, jpg, png or format. This index file can contain additional information about the patient, such as medical history, test results, or treatment plans.
- Upload a medical file and store in the patient’s record at the specified
INDEX. The index refers to the index number shown in the displayed patient list. The index must be a positive whole number 1,2,3 …
Examples:
-
upload 1will pop-up a window such that user can navigate and upload the desired file. File will be stored in the application.
Upload Medical File of a patient’s through button:
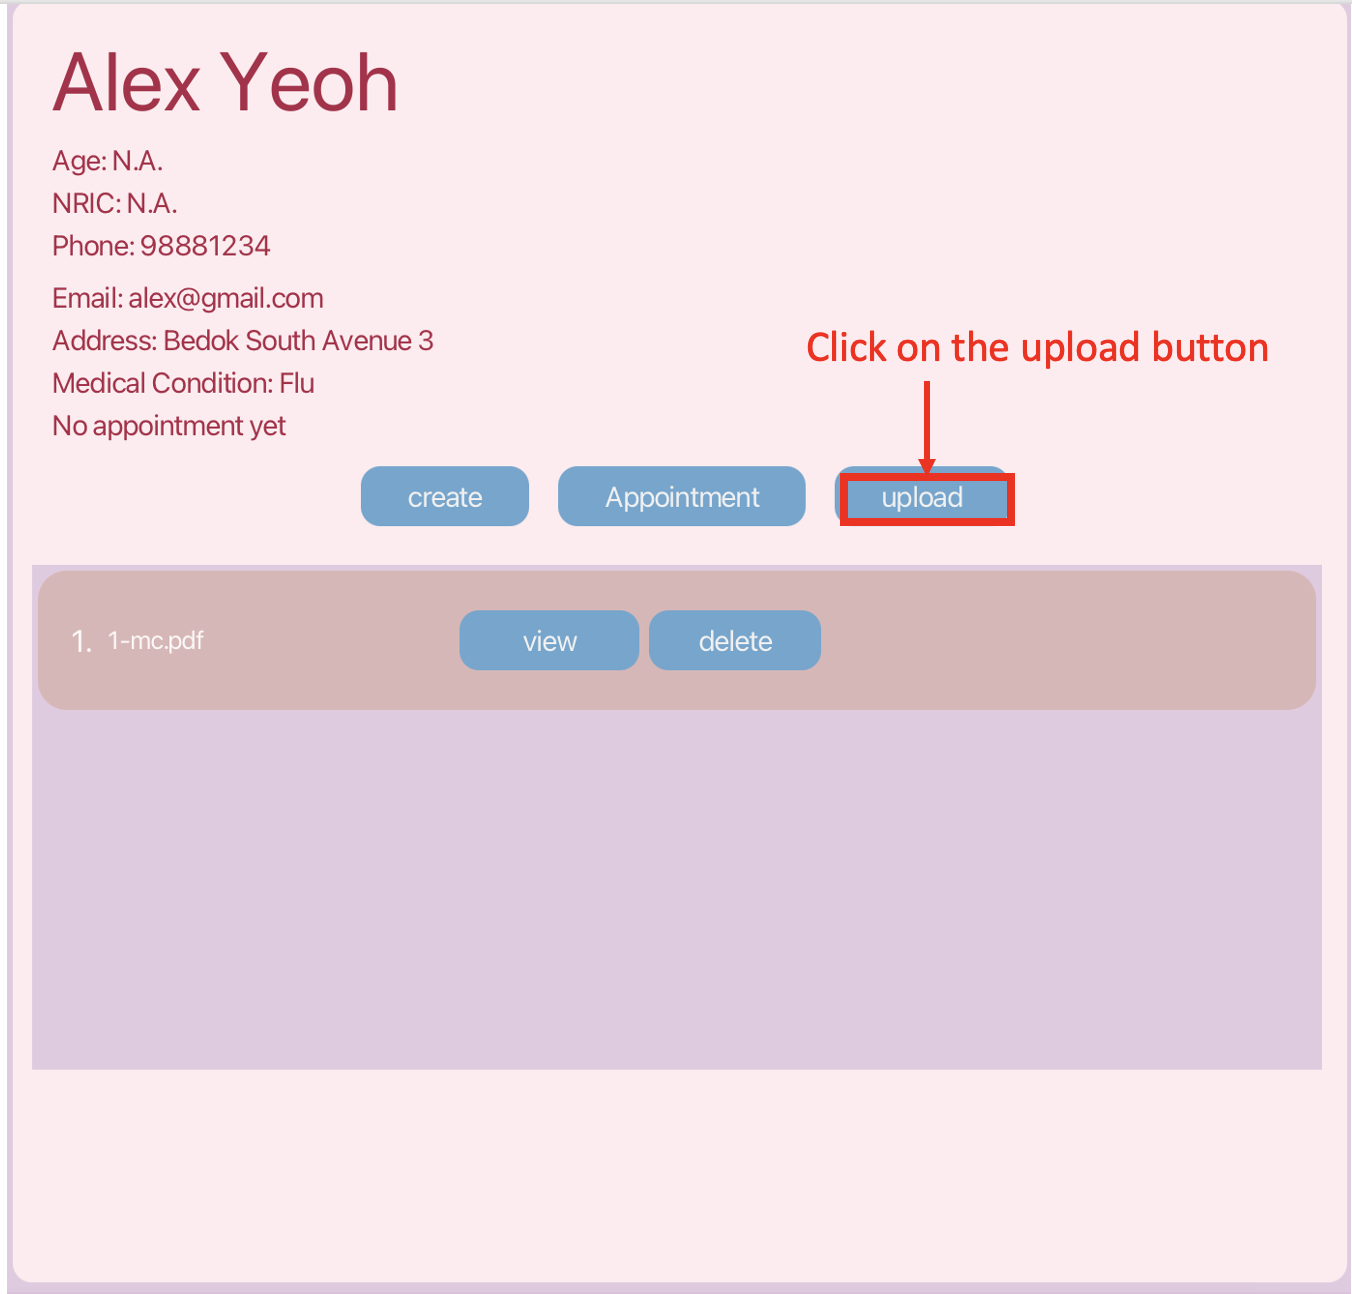
- Click on the upload button as shown in the screenshot above.
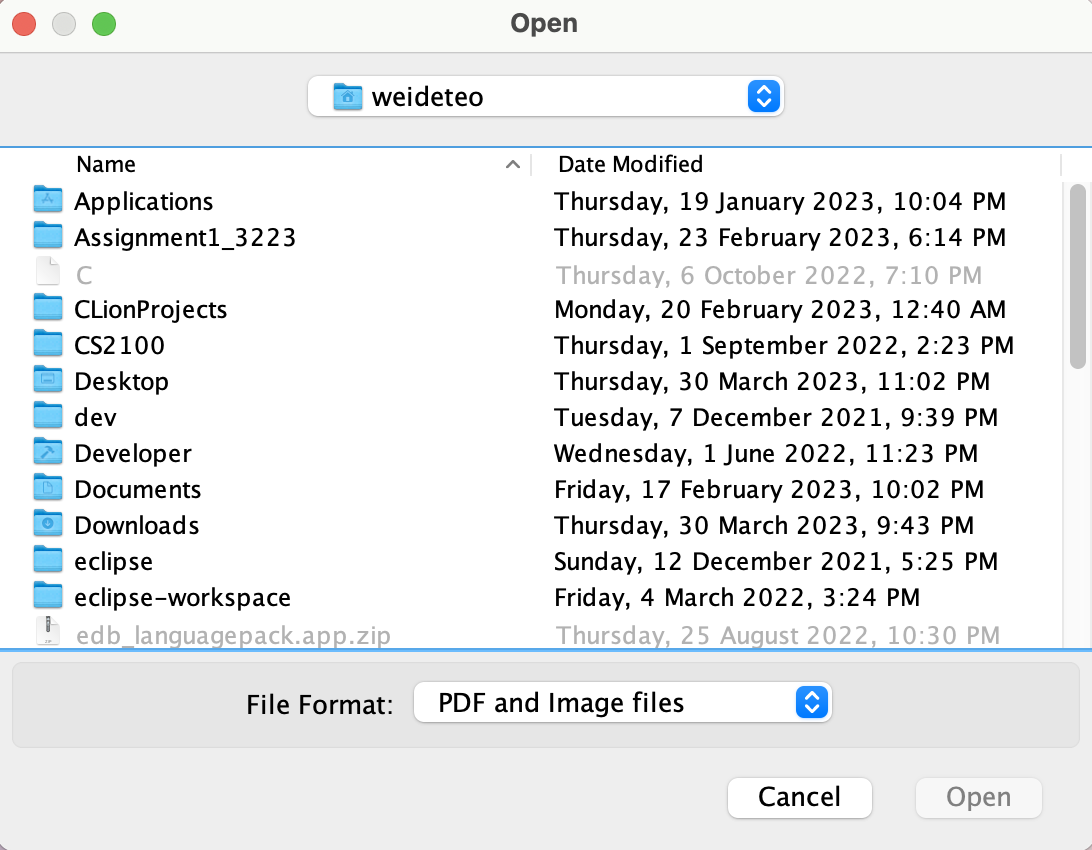
- A popup window appear, as shown in the screenshot above. Select the file you want to upload into MediMate through clicking Open. Now, you have successfully uploaded the medical file.
Locating patients by name : find
Finds patients whose names contain any of the given keywords.
Format: find KEYWORD [MORE_KEYWORDS]
- The search is case-insensitive. e.g
hanswill matchHans - The order of the keywords does not matter. e.g.
Hans Bowill matchBo Hans - Only the name is searched.
- Only full words will be matched e.g.
Hanwill not matchHans - Patients matching at least one keyword will be returned (i.e.
ORsearch). e.g.Hans Bowill returnHans Gruber,Bo Yang
Example:
-
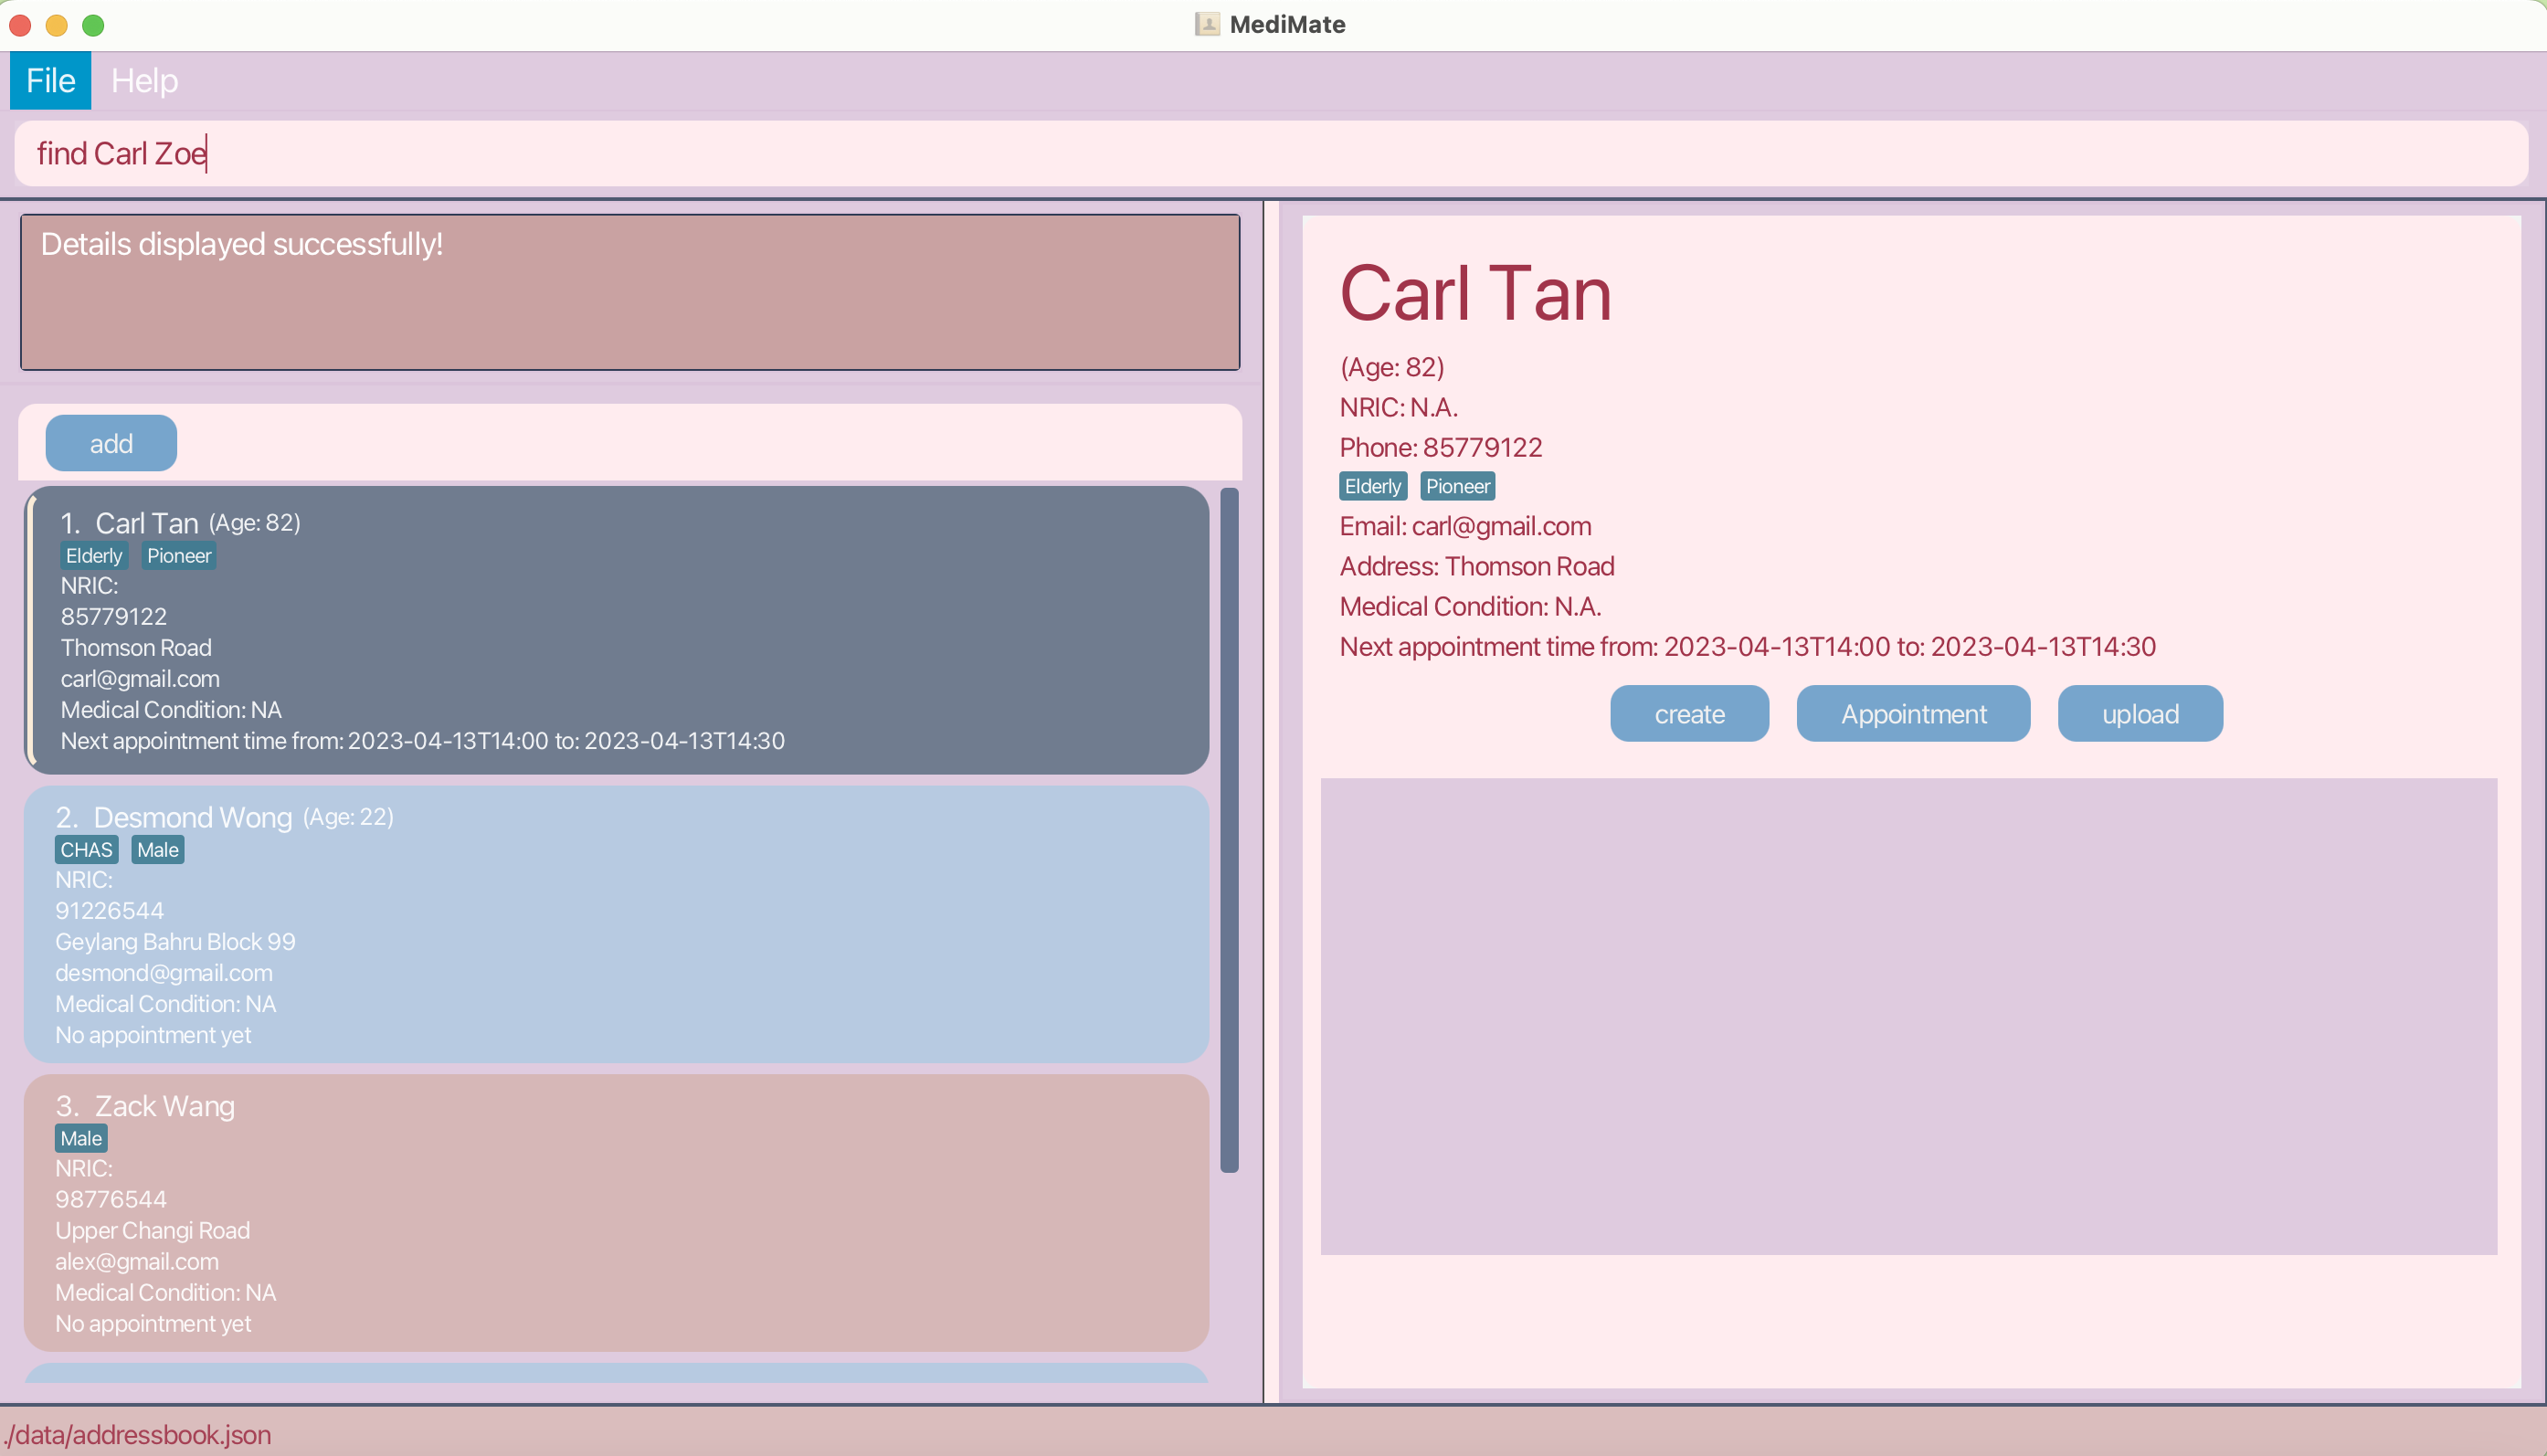
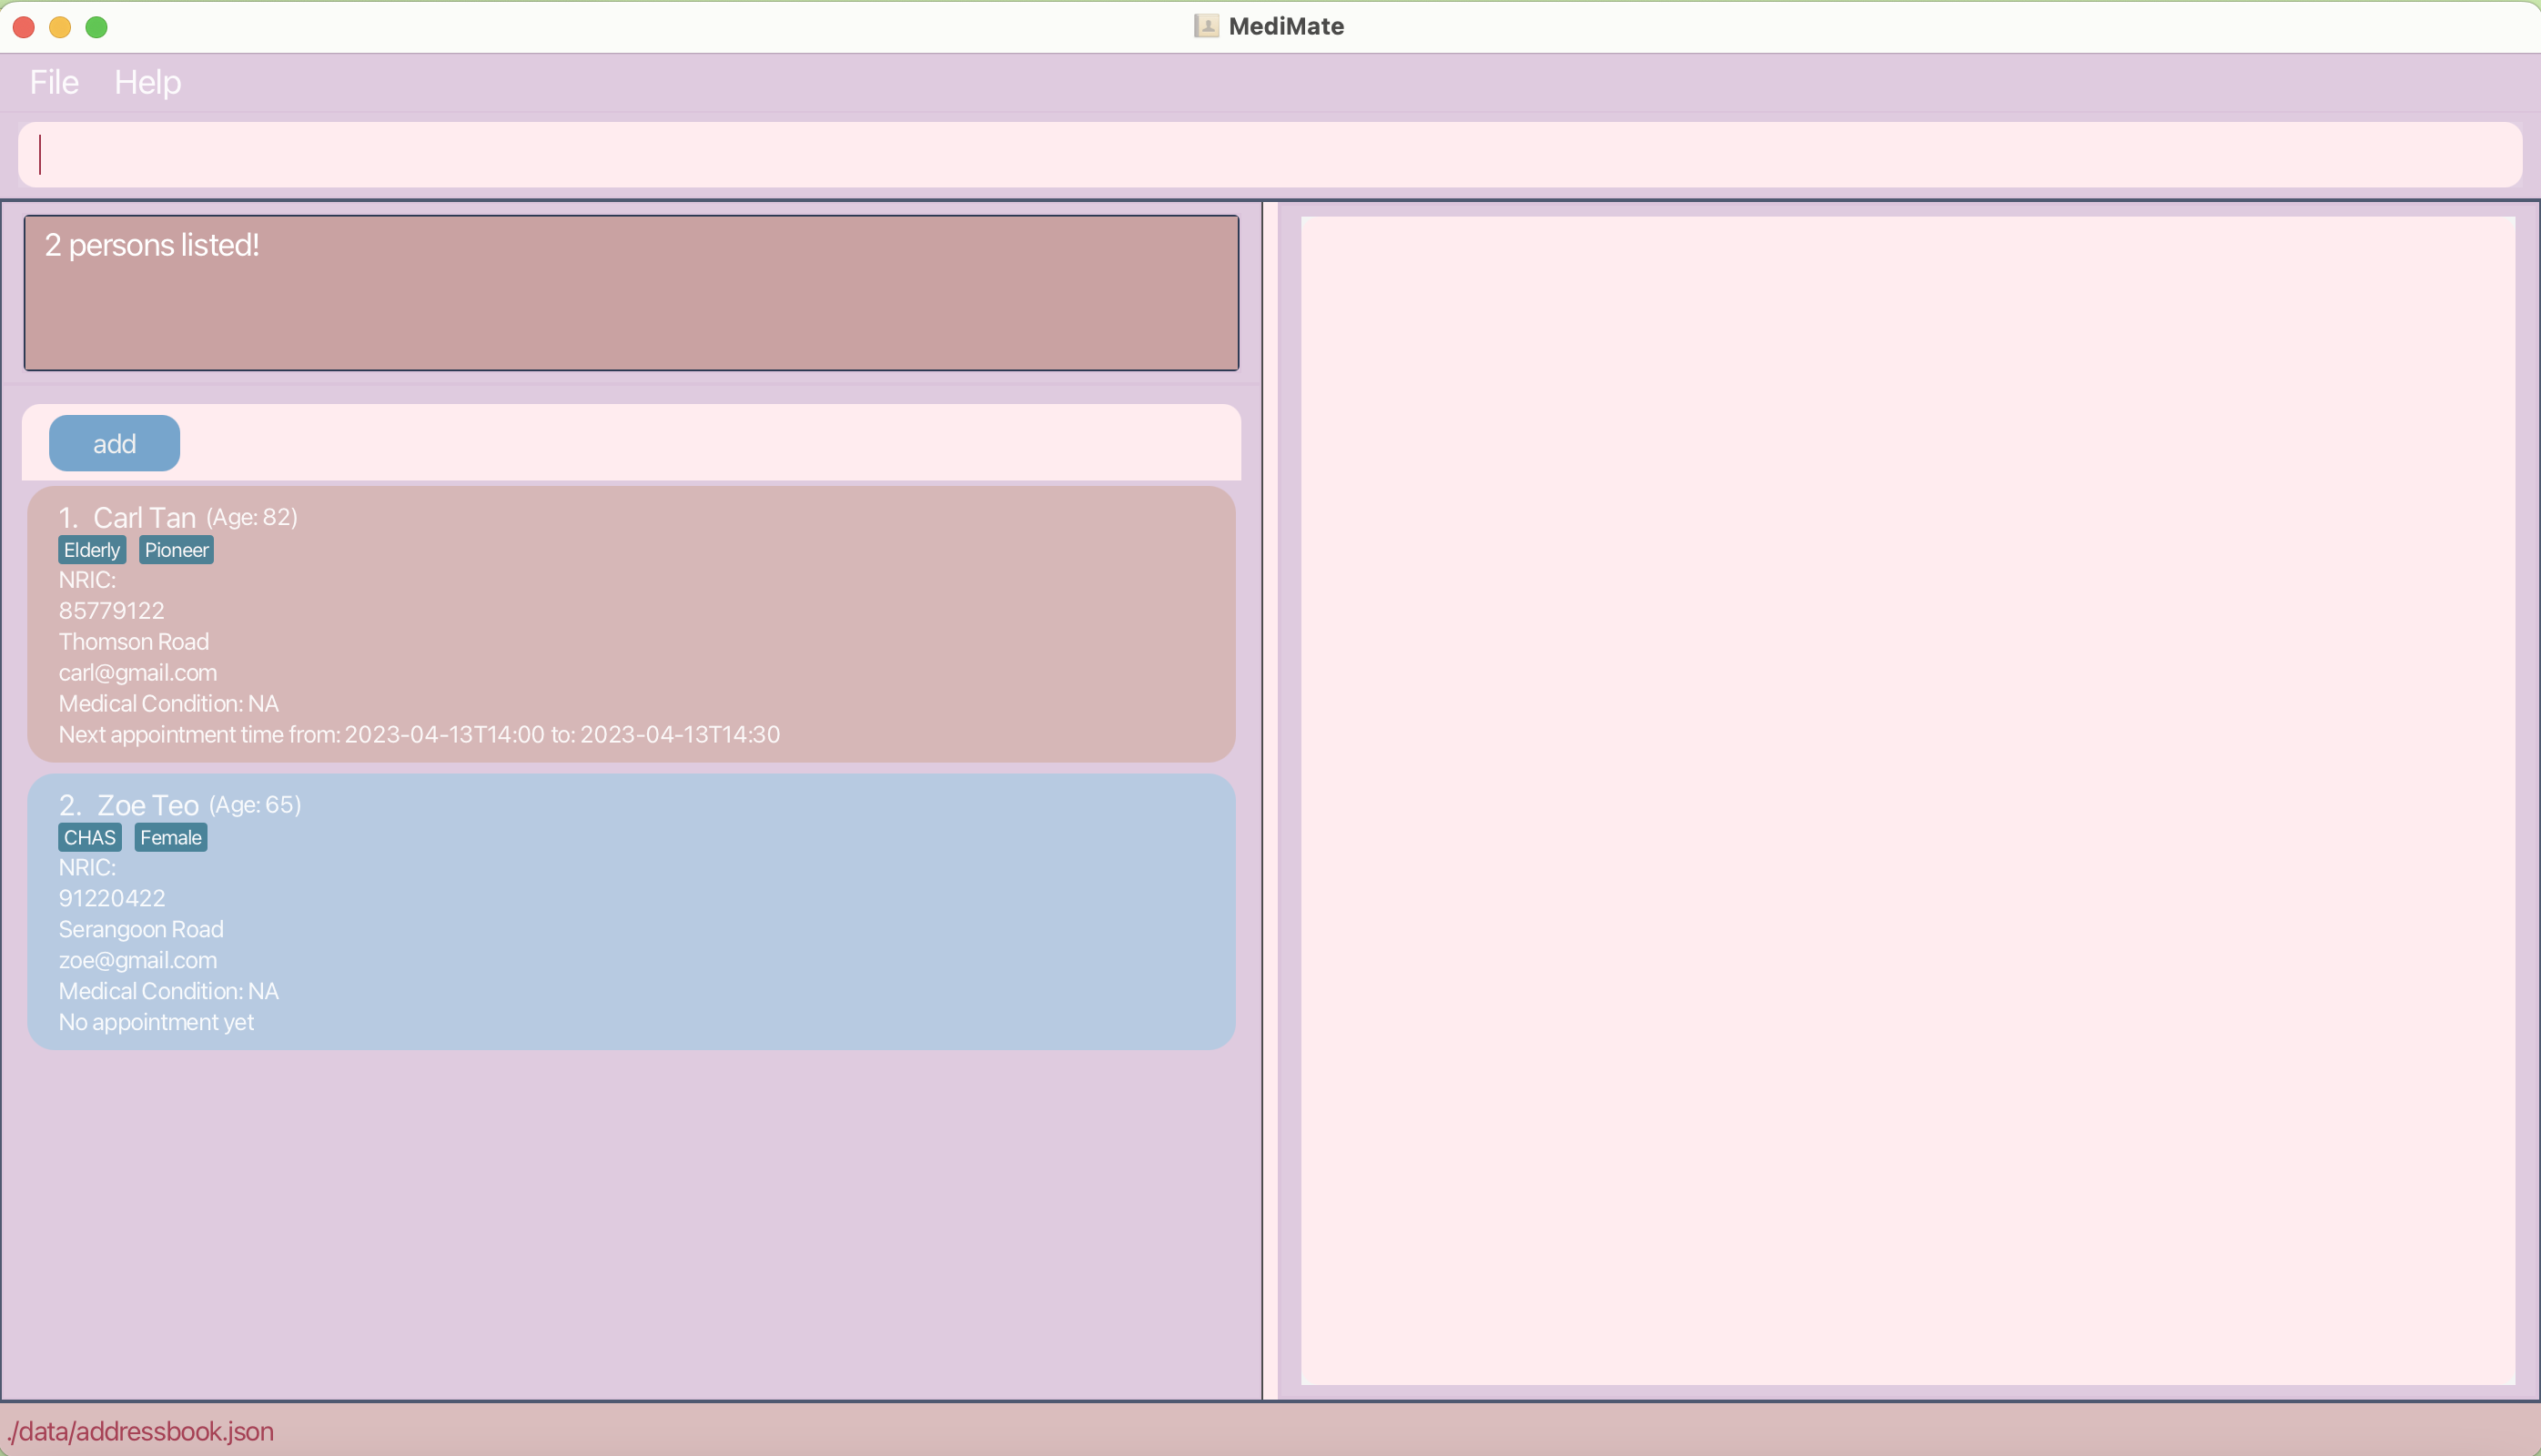
find Carl Zoewill return onCarlandZoerespectively on Medimate.
Searching patients with Appointment on specified date: searchDate
Lists all patients with appointment on specified date
Format: searchDate {DATE}
- Lists all patients with appointment on the specified date, and it will be sorted from earliest to latest appointment time, for easier scheduling of new appointment.
-
DATEneed to be in YYYY-MM-DD format.
Examples:
-
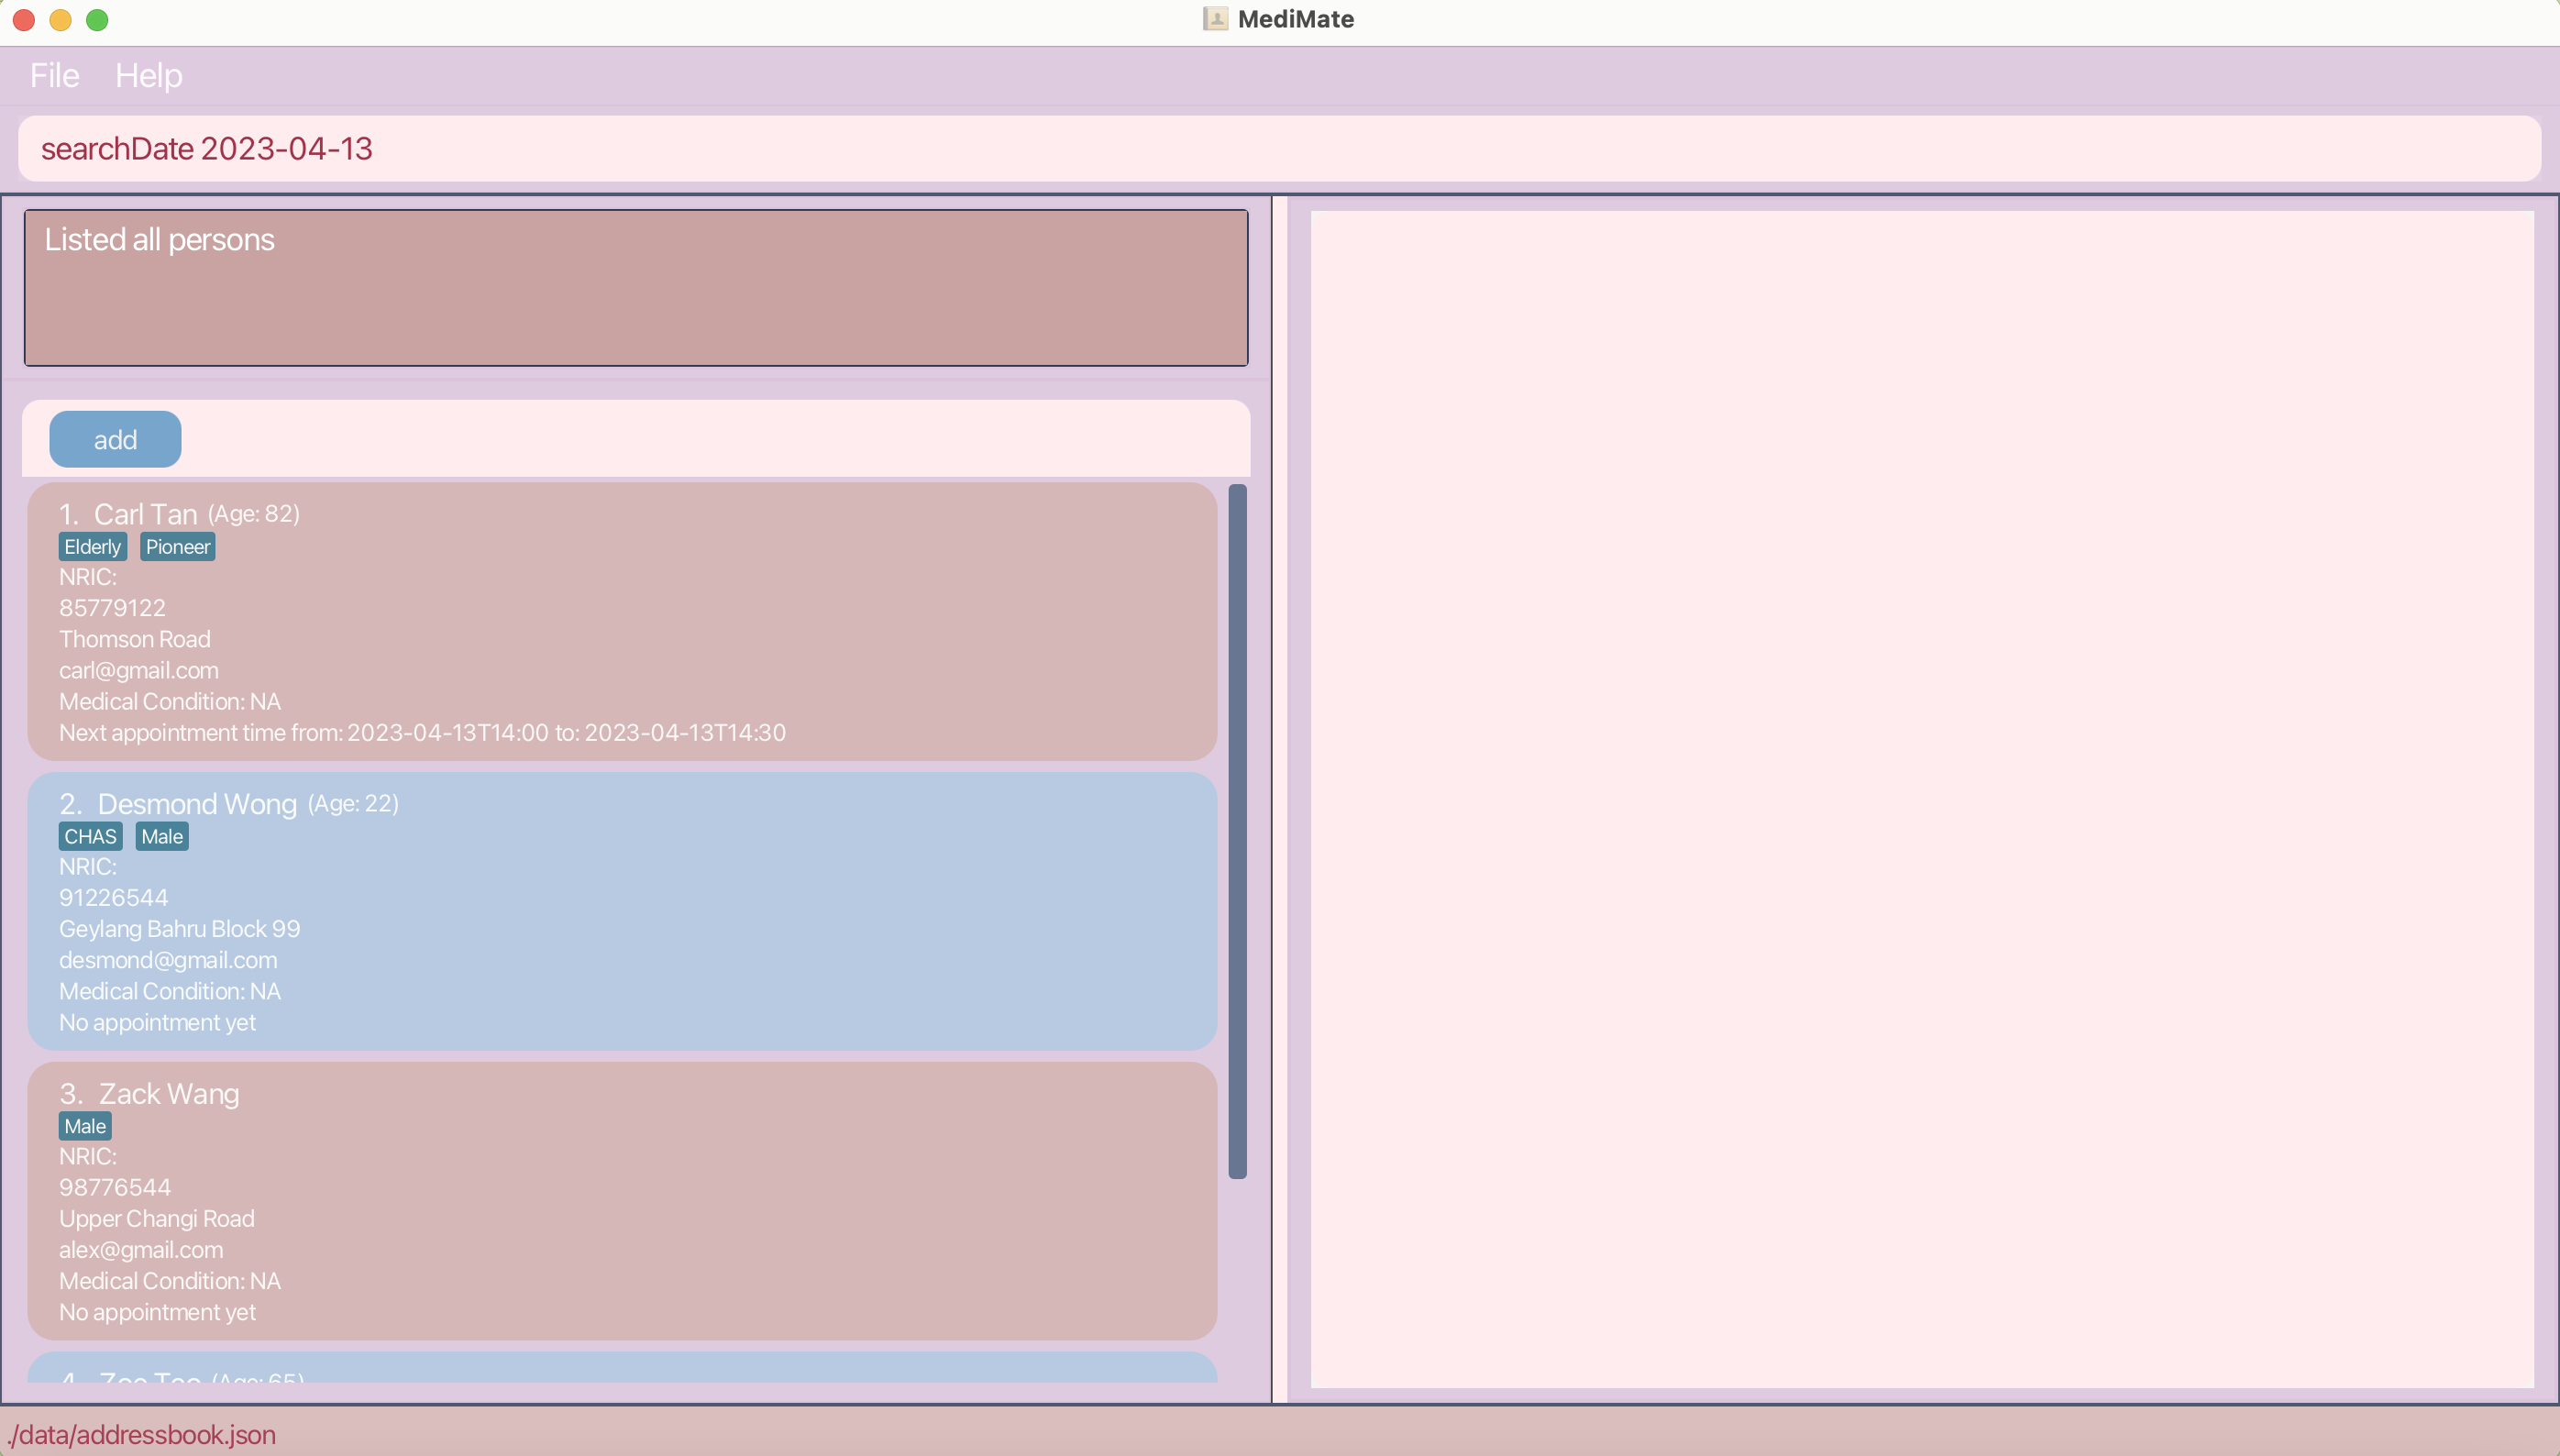
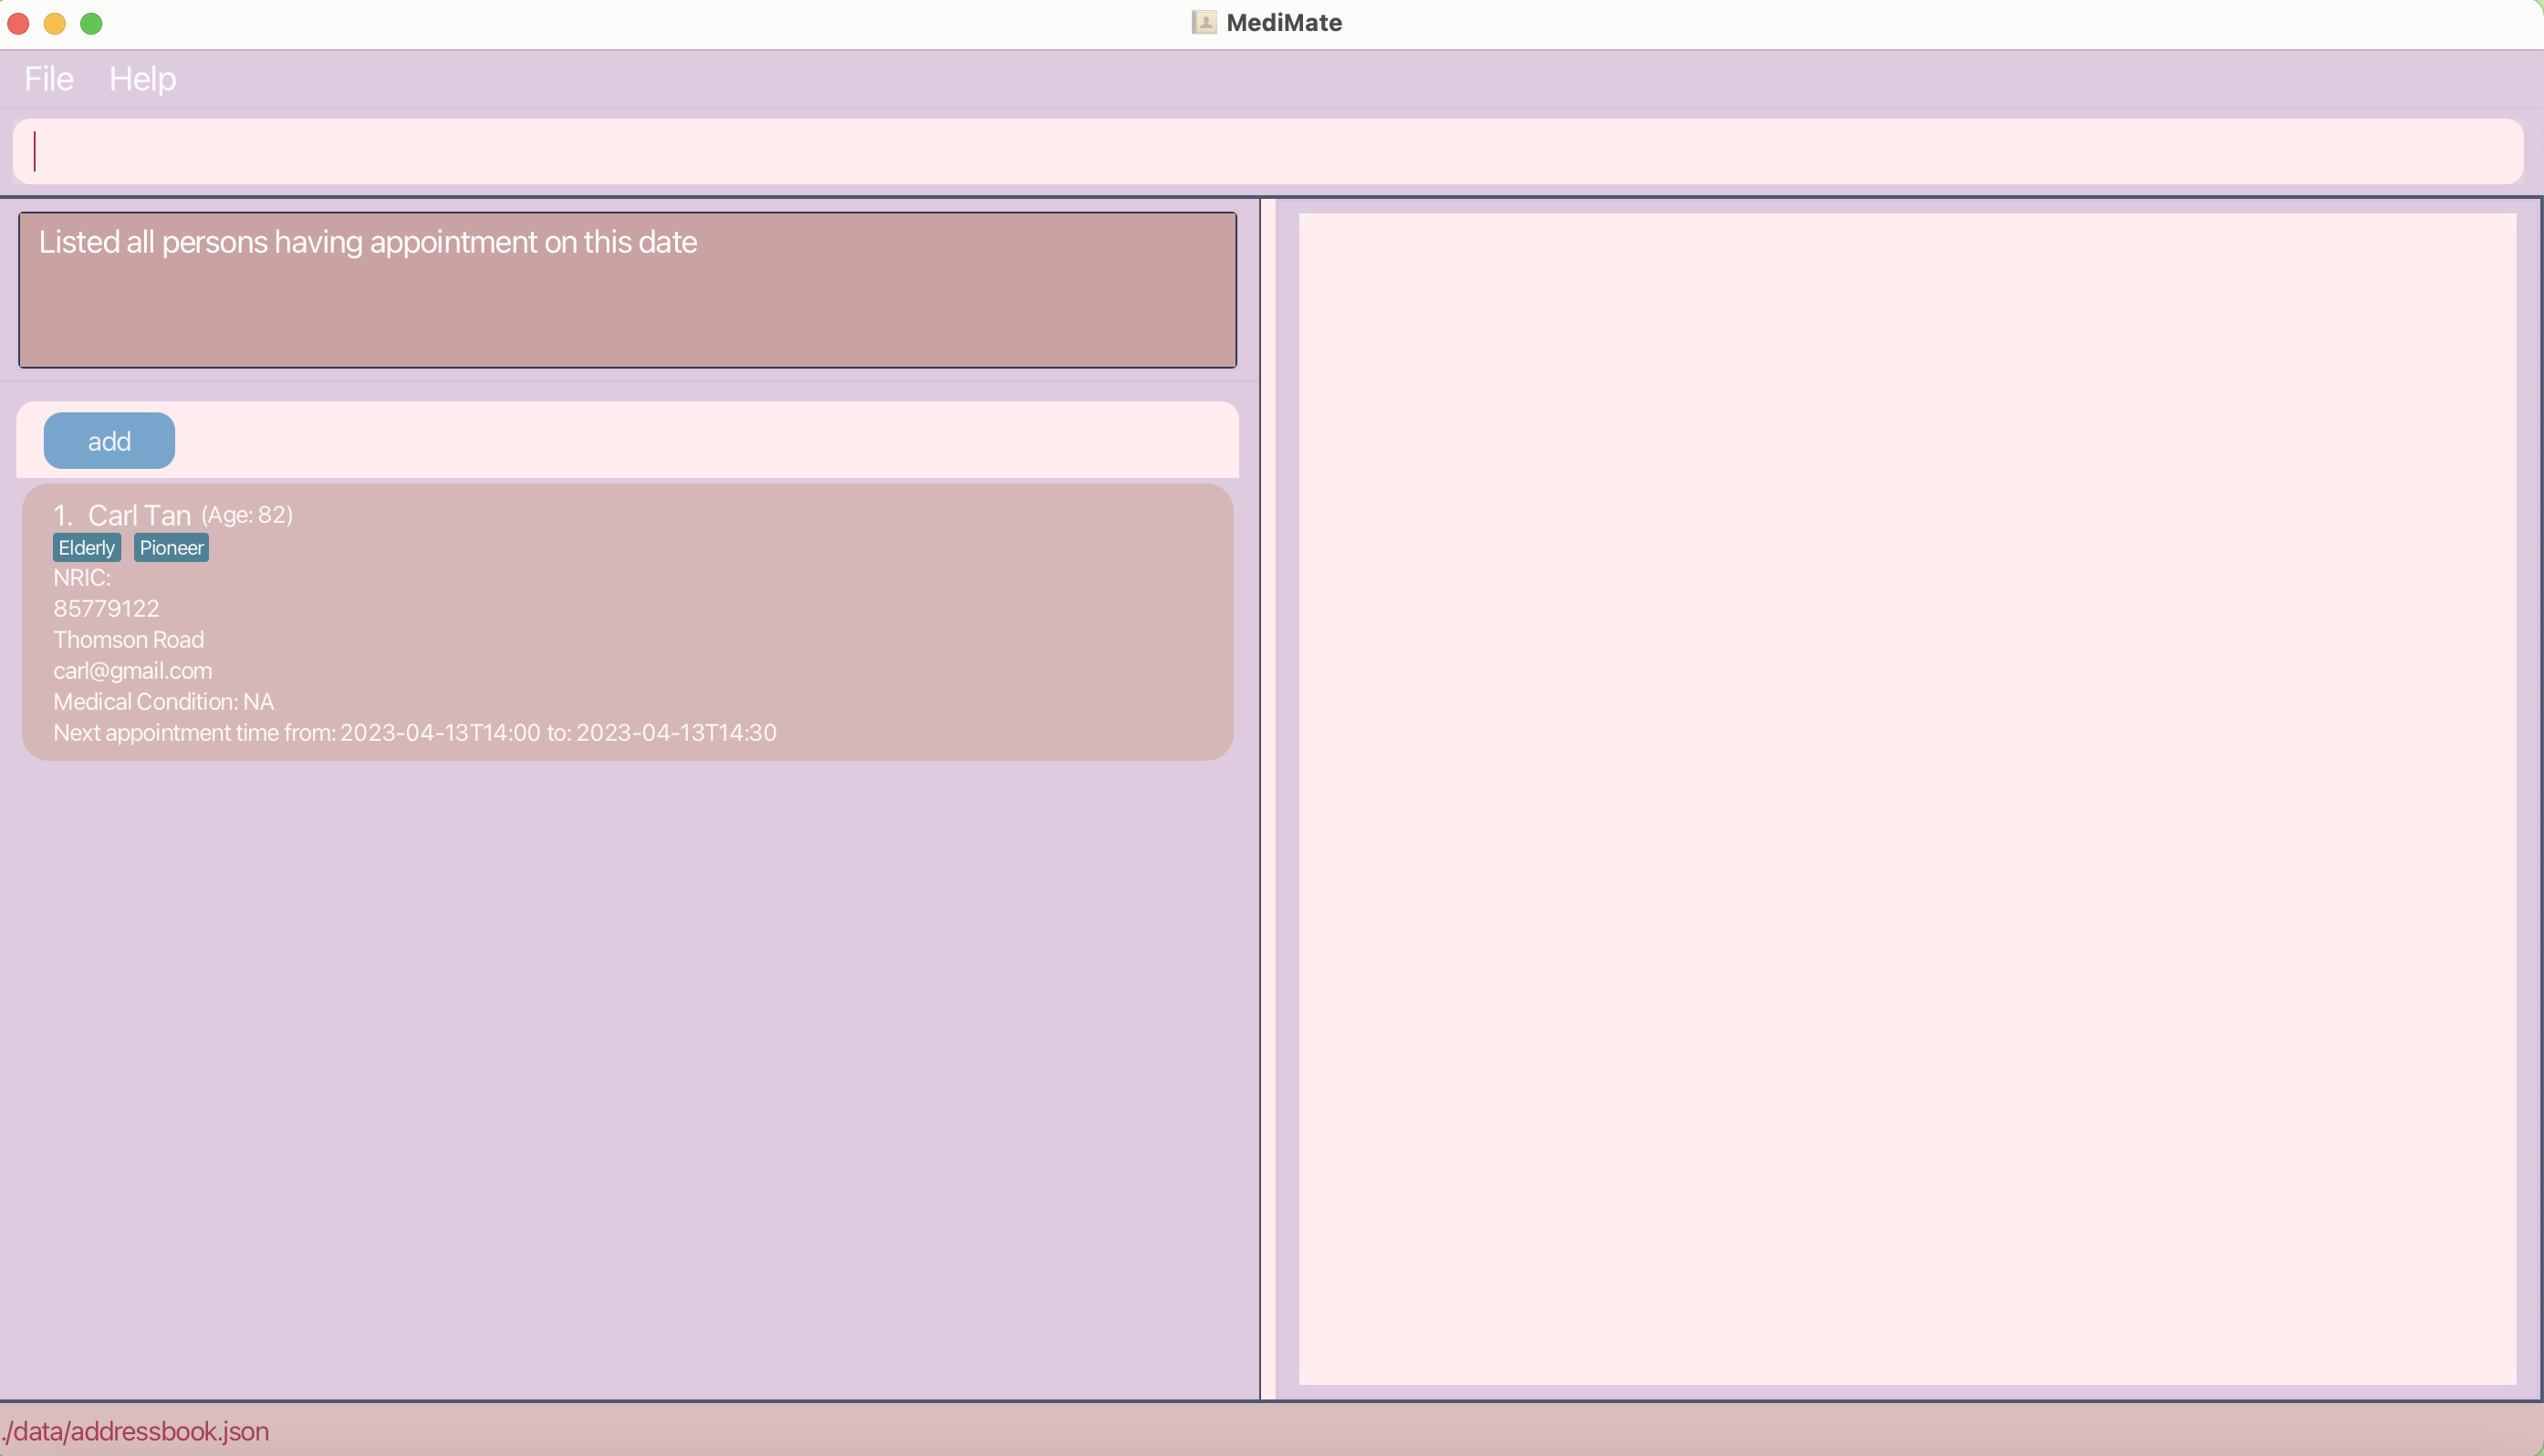
searchDate 2023-04-13lists one patient with appointment on 2023-04-13.
Deleting a patient : delete
Deletes the specified patient from the MediMate.
Format: deletes INDEX
- Deletes the patient at the specified
INDEX. - The
INDEXrefers to the index number shown in the displayed patient list. - The
INDEXmust be a positive whole number 1, 2, 3, …
Examples:
-
listfollowed bydelete 2deletes the 2nd patient in the patient list. -
find Betsyfollowed bydelete 1deletes the 1st patient in the results of thefindcommand.
Deleting multiple patients : deletes
Deletes the specified patient from the MediMate.
Format: deletes INDEX1 INDEX2 …
- Deletes multiple patients records at the specified INDEX.
- The INDEX refers to the index number shown in the displayed patient list.
- INDEX must be a positive whole number 1, 2, 3, …
- The order of the INDEX does not need to be sequential or follow a specific numerical pattern.
Examples:
-
listfollowed bydelete 2 3deletes the 2nd and 3rd person in MediMate. -
listfollowed bydelete 3 1deletes the 3rd and 1st person in MediMate. -
find Betsyfollowed bydelete 1 2deletes the 1st and 2nd person in the results of thefindcommand.
Delete a medical file for the specified patient: deletefile
Delete a medical file from the patient’s record and remove it from the database.
Format: deletefile INDEX {FILE INDEX}
- The
INDEXrefers to the index number shown in the displayed patient list. -
FILE INDEXrefers to the index number shown in the list at the patient panel, which contains all the relevant medical reports of the specified patient’s. - Both
INDEXandFILE INDEXmust be a positive whole number 1, 2, 3, … - If index and file index inputted are values less than 0 or more than the number of patients in the patient list,
deletefilewill not execute successfully.
Examples:
-
deletefile 1 1Deletes the first medical file of the 1st patient.
Clearing all entries : clear
Clears all entries from the patient list.
Format: clear
Exiting the program : exit
Exits the program.
Format: exit
Saving the data
MediMate data are saved in the hard disk automatically after any command that changes the data. There is no need to save manually.
Editing the data file
MediMate data are saved as a JSON file [JAR file location]/data/MediMate.json. Advanced users are welcome to update data directly by editing that data file.
FAQ
Q: How do I transfer my data to another Computer?
A: Install the app in the other computer and overwrite the empty data file it creates with the file that contains the data of your previous MediMate home folder.
Restriction on add and edit
- Name allows number as a valid input.
- No special characters is allowed at the start or end of the email
username. (username@domain.com) - No multiple consecutive of special characters (More than 1) is allowed at the middle of the email username.
- Allowed special characters for email are
+,_,-,.- e.g.
abc@gmail.comis allowed - e.g.
a.b+c@gmail.comis allowed - e.g.
ab..c@gmail.comis not allowed - e.g.
abc.@gmail.comis not allowed - e.g.
.abc@gmail.comis not allowed
- e.g.
- You can add any number of tags to the patient’s profile by adding
t/followed by the tag. (E.gt/Friend) - Nric has restriction for first letter, where it must be either ‘S’, ‘T’ or ‘G’ (E.g. S9935010Y) and length must be 9.
- Nric is case-sensitive. Hence, ‘s’ , ‘t’ or ‘g’ is not allowed for the first letter.
- Nric has no restriction from second letter onwards, hence user need to be careful as alphabets is still recognised as a valid input after the first letter.
- Nric is not unique. Hence, please be aware to check your Nric input before adding to prevent duplicate Nric with other patient’s.
- Age need to be less than or equal to 120 and must be a positive whole number.
- Invalid prefix (such as
AG/in upper case orEDITSSunknown prefix) will cause MediMate to assume it as the description of the previous prefix or unknown command respectively.
Command summary
| Action | Format, Examples |
|---|---|
| Help | help |
| Add |
add n/NAME p/PHONE_NUMBER e/EMAIL a/ADDRESS [ag/AGE] [m/MEDICAL_CONDITION] [nric/NRIC_NUMBER] [t/TAG]… e.g., add n/James Ho p/22224444 e/jamesho@example.com a/123, Clementi Rd, 1234665 ag/20 n/Flu nric/S9524050Y t/friend t/colleague
|
| List | list |
| List by Name | list_name |
| Show Patient’s Detail | show INDEX |
| Edit |
edit INDEX [n/NAME] [p/PHONE_NUMBER] [e/EMAIL] [a/ADDRESS] [t/TAG]…e.g., edit 2 n/James Lee e/jameslee@example.com
|
| Make new Appointment |
makeApp INDEX from/START_TIME to/END_TIME <br> e.g., e.g. makeApp 5 /from 2023-08-15 1430 /to 2023-08-15 1630
|
| Mark Appointment |
markApp INDEX e.g. markApp 5
|
| Create PDF Medical Certificate |
create INDEX doc/DOCTOR_NAME [m/MEDICAL_CONDITION] d/DAYS e.g. create 1 doc/James Lee m/Asthma d/2
|
| View Medical Files |
view INDEX {FILE INDEX} e.g. view 1 1
|
| Upload Medical Files |
upload INDEX e.g. upload 1
|
| Find |
find KEYWORD [MORE_KEYWORDS]e.g., find James Jake
|
| Search Appointment Date |
searchDate {DATE} e.g. searchDate 2023-04-02
|
| Delete |
delete INDEXe.g., delete 3
|
| Delete Multiple Patients Records |
deletes INDEX1 INDEX2 e.g. deletes 1 2
|
| Delete a patient’s Medical File |
deleteFile INDEX {FILE INDEX} e.g. deleteFile 1 2
|
| Clear | clear |
| Exit The Application | exit |