MediMate's Developer Guide
- Acknowledgements
- Setting up, getting started
- Design
- Implementation
- Documentation, logging, testing, configuration, dev-ops
- Appendix: Requirements
- Appendix: Instructions for manual testing
Acknowledgements
- External API:
pdfbox-app-2.027 - Reused code from
AY2223S1-CS2103T-T17-1for UI design - Reused code from
AY2223S1-CS2103T-W11-3for UI design
Setting up, getting started
Refer to the guide Setting up and getting started.
Design
.puml files used to create diagrams in this document can be found in the diagrams folder. Refer to the PlantUML Tutorial at se-edu/guides to learn how to create and edit diagrams.
Architecture

The Architecture Diagram given above explains the high-level design of the App.
Given below is a quick overview of main components and how they interact with each other.
Main components of the architecture
Main has two classes called Main and MainApp. It is responsible for,
- At app launch: Initializes the components in the correct sequence, and connects them up with each other.
- At shut down: Shuts down the components and invokes cleanup methods where necessary.
Commons represents a collection of classes used by multiple other components.
The rest of the App consists of four components.
-
UI: The UI of the App. -
Logic: The command executor. -
Model: Holds the data of the App in memory. -
Storage: Reads data from, and writes data to, the hard disk. -
Files: Manage the uploaded and created files to the hard disk.
How the architecture components interact with each other
The Sequence Diagram below shows how the components interact with each other for the scenario where the user issues the command delete 1.

Each of the five main components (also shown in the diagram above),
- defines its API in an
interfacewith the same name as the Component. - implements its functionality using a concrete
Managerclass (which follows the corresponding APIinterfacementioned in the previous point.
For example, the Logic component defines its API in the Logic.java interface and implements its functionality using the LogicManager.java class which follows the Logic interface. Other components interact with a given component through its interface rather than the concrete class (reason: to prevent outside component’s being coupled to the implementation of a component), as illustrated in the (partial) class diagram below.

The sections below give more details of each component.
UI component
The API of this component is specified in Ui.java
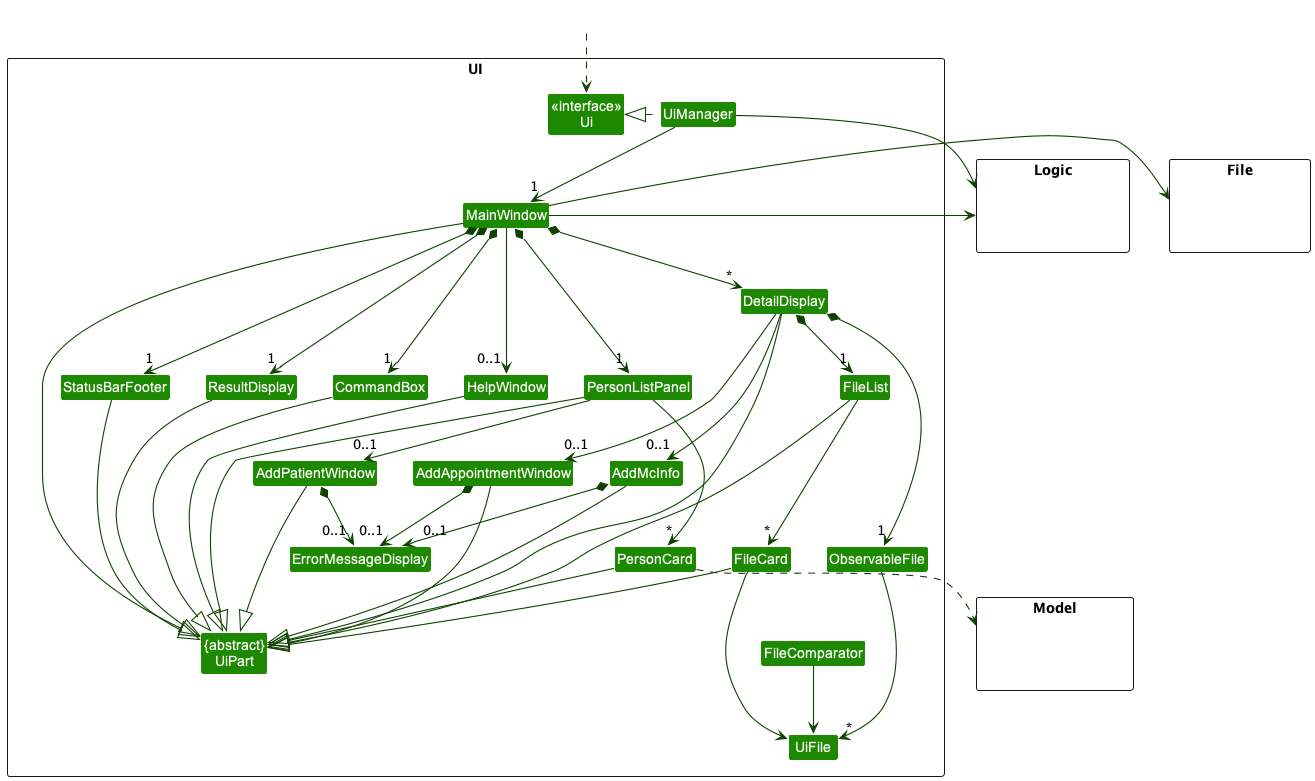
The UI consists of a MainWindow that is made up of various parts e.g.CommandBox, ResultDisplay, PersonListPanel, StatusBarFooter, DetailDisplay and etc. All these, including the MainWindow, inherit from the abstract UiPart class, which captures the commonalities between classes that represent parts of the visible GUI.
The UI component uses the JavaFx UI framework. The layout of these UI parts are defined in matching .fxml files that are in the src/main/resources/view folder. For example, the layout of the MainWindow is specified in MainWindow.fxml
The UI component,
- executes user commands using the
Logiccomponent. - listens for changes to
Modeldata so that the UI can be updated with the modified data. - keeps a reference to the
Logiccomponent, because theUIrelies on theLogicto execute commands. - depends on some classes in the
Modelcomponent, as it displaysPersonobject residing in theModel.
Logic component
API : Logic.java
Here’s a (partial) class diagram of the Logic component:

How the Logic component works:
- When
Logicis called upon to execute a command, it uses theAddressBookParserclass to parse the user command. - This results in a
Commandobject (more precisely, an object of one of its subclasses e.g.,AddCommand) which is executed by theLogicManager. - The command can communicate with the
Modelwhen it is executed (e.g. to add a person). - The result of the command execution is encapsulated as a
CommandResultobject which is returned back fromLogic.
The Sequence Diagram below illustrates the interactions within the Logic component for the execute("delete 1") API call.

DeleteCommandParser should end at the destroy marker (X) but due to a limitation of PlantUML, the lifeline reaches the end of diagram.
Here are the other classes in Logic (omitted from the class diagram above) that are used for parsing a user command:

How the parsing works:
- When called upon to parse a user command, the
AddressBookParserclass creates anXYZCommandParser(XYZis a placeholder for the specific command name e.g.,AddCommandParser) which uses the other classes shown above to parse the user command and create aXYZCommandobject (e.g.,AddCommand) which theAddressBookParserreturns back as aCommandobject. - All
XYZCommandParserclasses (e.g.,AddCommandParser,DeleteCommandParser, …) inherit from theParserinterface so that they can be treated similarly where possible e.g, during testing.
Model component
API : Model.java
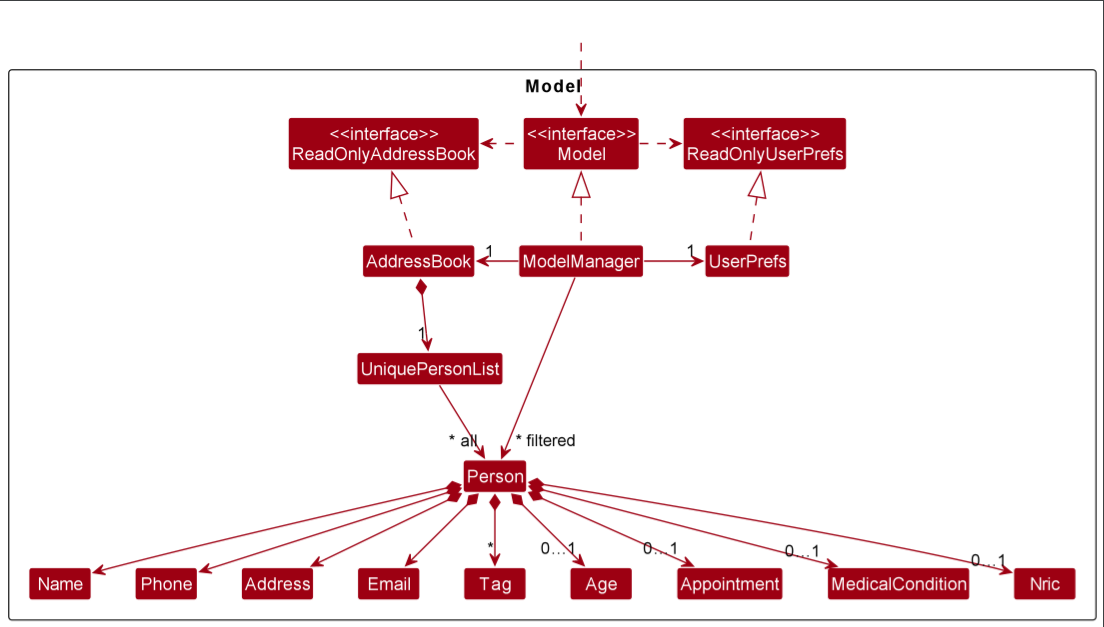
The Model component,
- stores the address book data i.e., all
Personobjects (which are contained in aUniquePersonListobject). - stores the currently ‘selected’
Personobjects (e.g., results of a search query) as a separate filtered list which is exposed to outsiders as an unmodifiableObservableList<Person>that can be ‘observed’ e.g. the UI can be bound to this list so that the UI automatically updates when the data in the list change. - stores a
UserPrefobject that represents the user’s preferences. This is exposed to the outside as aReadOnlyUserPrefobjects. - does not depend on any of the other three components (as the
Modelrepresents data entities of the domain, they should make sense on their own without depending on other components)
Tag list in the AddressBook, which Person references. This allows AddressBook to only require one Tag object per unique tag, instead of each Person needing their own Tag objects.
Storage component
API : Storage.java

The Storage component,
- can save both address book data and user preference data in json format, and read them back into corresponding objects.
- inherits from both
AddressBookStorageandUserPrefStorage, which means it can be treated as either one (if only the functionality of only one is needed). - depends on some classes in the
Modelcomponent (because theStoragecomponent’s job is to save/retrieve objects that belong to theModel)
Files component
API : Files.java
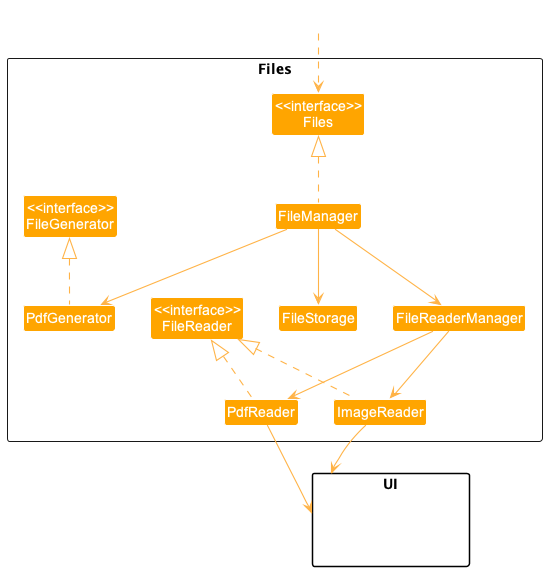
The Files component,
- Multiple files handling capabilities: The
Filescomponent is designed to handle various file types, such as PDF and images. - It is capable of processing these files, rendering them for display, and managing their storage.
- Inheritance: By implementing both
FileReaderandFileGeneratorinterfaces, - the
Filescomponent provides a flexible foundation for specialized file handling classes, such asPdfReaderandImageReader. - This modular design allows the component to extend its functionality when needed.
- Dependency on
FileReaderManagerandFileManager: TheFilescomponent relies on theFileReaderManagerclass to determine which specialized file handler to use based on the input file type. - The
FileManagerclass, in turn, utilizes theFileReaderManagerto manage and process different file types effectively. - Interaction with the UI component: The
PdfReaderandImageReaderclasses are responsible for rendering the files in a format suitable for display. - They return the rendered files to the UI component, which then presents the content to the user.
Common classes
Classes used by multiple components are in the seedu.addressbook.commons package.
Implementation
This section describes some noteworthy details on how certain features are implemented.
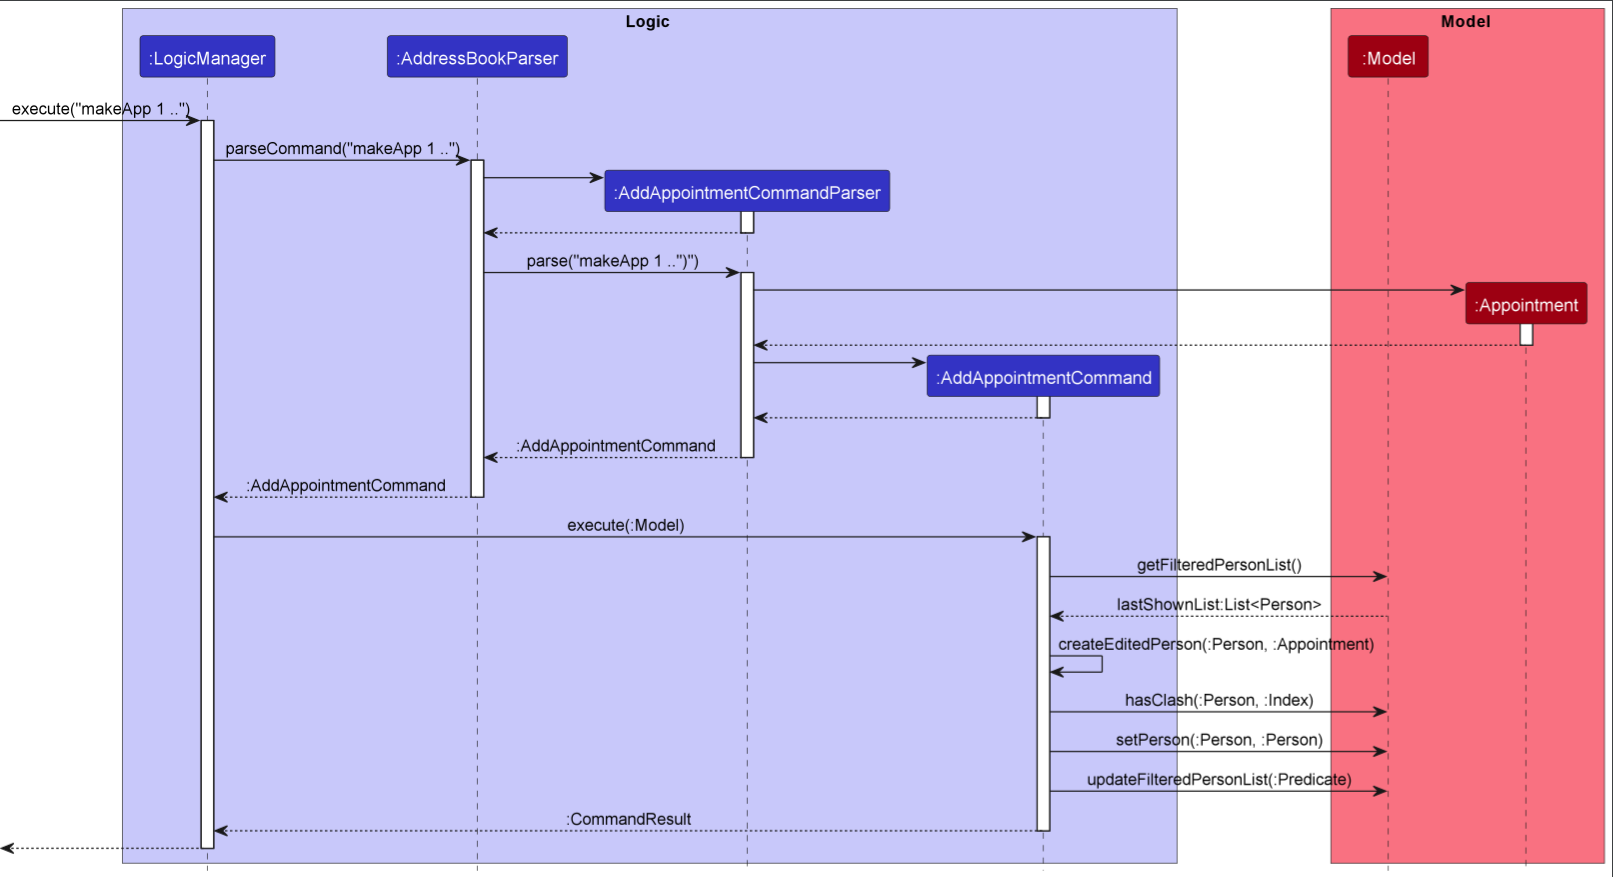
1. Making appointment
This feature servers as one of the core features of MediMate, so how is it implemented?
This feature is achieved by the following classes:
-
AddAppointmentCommand- when executed, it will add a new appointment to a specified patient -
AddAppointmentCommandParser- will parser user’s input and return a validAddAppointmentCommandfor execution
The format of command line input is as follows:
makeApp {patientIndex} /from {startTime} /to {endTime}
Initially, when the input is received, it is processed by the UI layer, which calls the
logic.execute(input) function and transfers the control to the logic layer. The execute(input)
function in the logic layer then utilizes the AddressBookParser to break down the input into tokens,
determine the commandʼs mode and calls relevant commandParser for further parsing. In this feature, specifically,
AddAppointmentCommandParser will be called.
Then, inside this parser, there are mainly three information being parsed:
- patientIndex - parsed by
parserIndexmethod inParserUtilclass - startTime - parsed by
parserDatemethond inParserUtilclass - endTime - parsed by
parserDatemethond inParserUtilclass
After all these pieces of information are being parserd, the parser class will create a new AddAppointmentCommand class
and transfer all information to it for further execution.
Then inside this command class, it will use all the information inputted by user to create a new patient with all other
details remaining the same while the only change in its appointment and then it calls model manager to substitute previous patient
with the new one by calling model.setPerson(previousPerson, newPerson)
Finally, ModelManager will connect to storage and save this change accordingly. Also, UI will detect this change
and refresh the whole patient list with the new appointment added.
2. Uploading Medical file for a Patient
This feature servers as one of the core features of MediMate, so how is it implemented?
- There are two ways to upload medical files for a patient within the application.
- Users can either utilize a command (similar to 1.Marking Appointment using UploadFileCommand) or click the
upload buttonin the user interface. - Medical files should be in PDF, JPG, or PNG format, and can contain additional information about the patient, such as medical history, test results, or treatment plans.
- This section will delve deeper into the implementation of the file uploading functionality when the user click
upload buttonwhich calls theFileManagerobject.
This feature is achieved by the following classes:
-
FileManager- offers anaddFilemethod that is invoked byUploadFileCommandand theupload button -
FileStorage- offers anuploadFilemethod that is invoked byaddFilemethod inFileManager
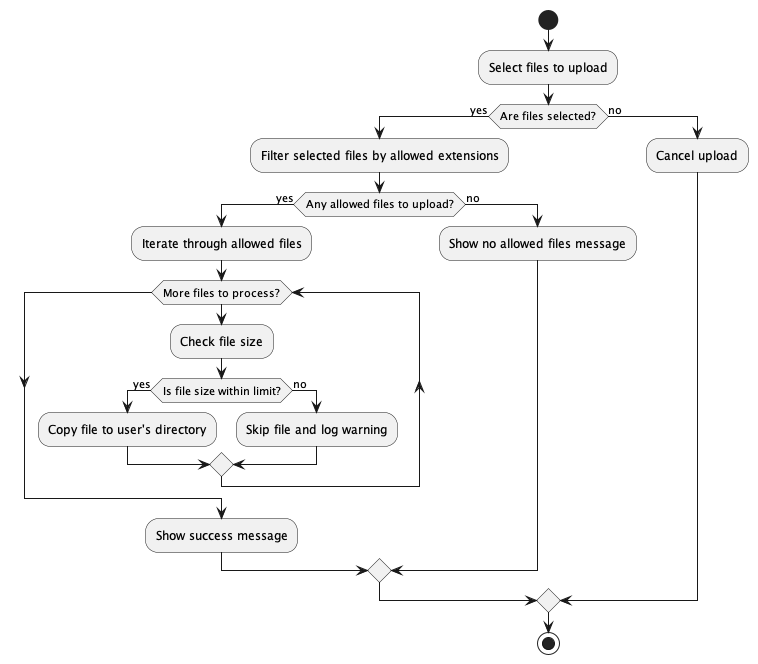
Initially, when user clicks the upload button, FileManger is initialised with the given Person Object and addFile method is called thus invoking uploadFile method.
- The uploadFile() method uses the
SwingUtilities.invokeLater()method to ensure that it runs on theEvent Dispatch Thread (EDT)for proper GUI interaction. - Within the
invokeLater()method, aJFileChooserobject is created and configured using theconfigFileChooser()method. The file chooser is set to allow multiple files selections and filter files based on their extensions: PDF, JPG, JPEG, and PNG. - The file chooser dialog is displayed, and the user can select multiple files. The method then checks if the user has approved the file selection.
- If the user has approved the file selection, an array of selected files is obtained. The target directory path is created using the
"reports/{username}/"format, where{username}is replaced with the username of the current user. - If the file meets the requirements, it is copied to the target directory.
Existing files with the same name in the target directory are replaced. If a file has anunsupported extensionorexceeds the maximum file size, anIOExceptionis thrown with a relevant error message. - After successfully uploading all the allowed files, a
success messageis displayed to the user through aJOptionPane.
3. Create medical certificate PDF file
This feature servers as one of the core features of MediMate, so how is it implemented?
- There are two ways to create medical certificate for a patient within the application.
Users can either utilize a command (similar to 1.Marking Appointment using CreateCommand ) or click the
create buttonin the user interface. - PDF file generated will be a copy of
MC.pdf. - External API:
pdfbox-app-2.027is used to read and writeMC.pdf. - This section will delve deeper into the implementation of the medical certificate creation functionality when the user click
create buttonfilling up with correct information and called theFileManagerobject.
This feature is achieved by the following classes:
-
FileManager- offers angenerateMcmethod that is invoked byCreateCommandand thecreate button -
PdfGenerator- offers angeneratemethod that is invoked bygenerateMCmethod inFileManager
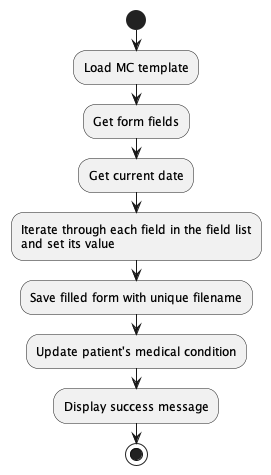
After the user click create button and filled up with the correct information (doctor name, medical condition, and days), FileManger is initialised with the given Person Object and generateMc method is called invoking generate method.
- The generate method creates a customized Medical Certificate (MC) PDF for a patient by loading a template, filling in the form fields, saving the filled form with a unique filename, updating the patient’s medical condition, and displaying a success message.
Documentation, logging, testing, configuration, dev-ops
Appendix: Requirements
Product scope
Target user profile:
- private doctor or doctor’s receptionist
- requires to manage large amount of patients details
- wants to organise and access patients data easily
- prefer desktop apps over other types
- prefers typing to mouse interactions
- is reasonably comfortable using CLI apps
Value proposition: The problem addressed is to assist in digitizing patient details. By converting traditional paper records into electronic ones, healthcare providers can easily and efficiently organize and manage patient data. This not only saves time and reduces the risk of errors, but it also makes it easier to retrieve and update the information when needed. Additionally, with the use of electronic scheduling systems, healthcare providers can easily schedule and reschedule appointments, improving the overall experience for both patients and staff. Overall, digitizing patient details helps to improve the quality of care and make the healthcare delivery process more streamlined and efficient.
User stories
Priorities: High (must have) - * * *, Medium (nice to have) - * *, Low (unlikely to have) - *
| Priority | As a … | I want to … | So that I can… |
|---|---|---|---|
* * * |
User | Record a person’s age | Keep track of their basic profile |
* * * |
User | Record a person’s phone number | Contact them conveniently |
* * * |
User | Record a person’s email/address | Efficiently manage the communication and consultation process with patients |
* * * |
User | Give patients zero or more tags | Easily classify different groups of patients by their illness, medication, and other information to serve their specific needs |
* * * |
User | Add a certain medical condition to a patient | Keep track of patients’ health conditions |
* * * |
User | Add patient’s nric number | Verify patients’ identity |
* * * |
User | Generate Medical Certificate for a patient | Quickly provide comprehensive PDF medical certificate during consultation |
* * * |
User | Upload local medical document of a patient | Efficiently manage each patient files in a centralized digital location |
* * * |
User | View patient’s medical documents | Quickly find the specific information needed from the patient for further diagnosis and treatment |
* * * |
User | List all current patients | View general information of all patients |
* * * |
User | Rank patients by appointments and names | Manage consultation time and content efficiently |
* * * |
User | Edit patient information (phone number, name, location, medical condition) | Update patient records |
* * * |
User | Edit a patient contact | Modify patient contact information |
* * * |
User | Schedule appointments | Book and manage appointments to reduce workload |
* * * |
User | Update appointment timing | Modify appointment times |
* * * |
User | Mark appointments as done | Indicate when appointments are completed |
* * * |
User | Search for patients by name | Locate patient records by name |
* * * |
User | Search for appointments by date | View appointments on a specific date |
* * * |
User | Access help function | Get information on using the software |
* |
User | Clear all contacts | Delete all patient records |
*** |
User | Delete appointment | Remove an appointment from the system |
*** |
User | Delete a patient file | Remove outdated or wrongly updated file from the system |
*** |
User | Delete a patient or multiple patients | Remove outdated patient from the system |
Use cases
(For all use cases below, the System is the Medimate and the Actor is the user, unless specified otherwise)
Use case: Delete a patient
MSS
- User requests to list patients.
- MediMate shows a list of patients.
- User requests to delete a specific patient in the list.
-
MediMate deletes the patient.
Use case ends.
Extensions
-
2a. The list is empty.
Use case ends.
-
3a. The given index is invalid.
-
3a1. MediMate shows an error message.
Use case resumes at step 2.
-
Use case: Edit a patient particulars
MSS
- User requests to Edit a patient details.
- MediMate asks for type of details.
- User chooses the type and enters the new details.
-
MediMate records the details.
Use case ends.
Extensions
- 1a. User enters wrong input format.
- 1a1. MediMate gives correct format and asks user to input again.
-
1a2. User enters the input with correct format.
Use Case ends.
- 1b. Patient does not exist.
- 1b1. MediMate reminds user to check for patient name.
-
1b2. User enters the input with correct format
Use Case ends.
- 3a. User enters Invalid type.
-
3a1. MediMate gives the available types and asks user to input again.
Use Case ends.
-
Use case: Find a patient particulars
MSS
- User requests to find a patient using her/his name.
- MediMate searches the patient.
-
MediMate displays the patient.
Use case ends.
Extensions
- 1a. User enters wrong input format.
- 1a1. MediMate gives correct format and asks user to input again.
-
1a2. User enters the input with correct format.
Use Case resumes at step 2.
- 2a. Patient does not exist.
- 2a1. MediMate reminds user to check for patient name.
-
2a2. User enter the input with existing patient name in correct format.
Use Case resumes at step 2.
Use case: Add a patient
MSS
- User requests to add a new patient.
- user enters the required patient information, including name, phone number, email, and address.
- user submits the patient information.
-
MediMate adds a patient and stores the information in the database.
Use Case ends.
Extensions
- 2a. user enters medical condition, age, appointment time, NRIC fields optionally.
- 2a1. user submits the patient information.
-
2a2. MediMate adds a patient and stores the information in the database.
Use case ends.
- 3a. User input format is wrong.
- 3a1. MediMate asks User for another correct input of the patient’s information.
-
3a2. User inputs patient’s information with the correct format.
Use Case resumes at step 2.
Use case: View patients’ document
MSS
- User requests to view patient’s file.
- MediMate retrieves the correspondent PDF document.
-
MediMate displays the PDF document to the user in a new window.
Use case ends.
- 1a. User enters wrong input format.
- 1a1. MediMate gives correct format and ask user to input again.
-
1a2. User inputs a new line of correct format.
Use Case resumes at step 2.
- 1b. Patient does not exist.
- 1b1. MediMate gives error message to remind user to check for patient index.
-
1b2. User inputs valid patient index with correct format.
Use Case resumes at step 2.
- 2a. File does not exist.
- 2a1. MediMate gives error message to remind user to check for file index.
-
2a2. User inputs valid file index with correct patient index and format.
Use Case resumes at step 3.
Use case: List patients by name
MSS
- User requests to list all patients based on their names.
-
MediMate displays a list of all patients sorted in order based on names.
Use case ends.
Extensions
-
1a. The list is empty.
Use case ends.
Use case: Upload reports for a patient
MSS
- User requests to upload reports for given patient.
- MediMate allows user to choose files.
- User uploads those selected files.
-
MediMate stores the uploaded files at patient’s directory.
Use Case ends.
Extensions
- 1a. User input format is wrong.
- 1a1. MediMate asks User for another correct input upload.
-
1a2. User inputs a new line of upload format.
Use Case resumes at step 2.
- 3a. User uploads unacceptable types of files
-
3a1. MediMate informs the user invalid file type can not be uploaded.
Use Case ends.
-
Use case: Generate MCs for given patient
MSS
- User requests to generate MC for given patients.
-
MediMate generates MC with user desired information and stores at patient directory.
Use case ends.
Extensions
-
1a. The list is empty.
Use case ends.
- 1b. User enters the wrong input format (eg: doctor name/medical condition exceeds length, invalid duration…)
- 1b1. MediMate informs the user the use of incorrect format.
-
1b2. user inputs valid format.
Use case resumes at step 2.
- 1c. User request to generate a new MC without finishing previous MC generation.
- 1c1. MediMate informs the user can not do multiple MC generation at the same time.
- 1c2. user finishes previous MC generation with correct format successfully.
Use case ends.
Use case: Display the detailed information of the patient
MSS
- User requests to display a specific patient’s detailed information.
-
MediMate displays the patient’s detailed information in the detail display pane.
Use case ends.
Extensions
- 1a. Index of the User input is out of bound of the current Person List.
- 1a1. MediMate asks the user for another correct input of the index.
-
1a2. User inputs a new valid index.
Use Case resumes at step 2.
Use case: Make an appointment for a patient
MSS
- User requests to make an appointment for the selected patient.
- MediMate asks for the date, starting time and ending time for the appointment.
- User inputs the date, starting time and ending time for the appointment.
-
MediMate makes the appointment for the patient.
Use case ends.
Extensions
- 3a. Starting time is before current time.
- 3a1. MediMate asks User for new valid appointment time.
- 3a2. User inputs valid appointment time. Use Case resumes at step 4.
- 3b. Starting time is after ending time.
- 3b1. MediMate asks User for new valid appointment time.
- 3b2. User inputs valid appointment time. Use Case resumes at step 4.
- 3c. User input appointment time has clash with the doctor’s schedule.
- 3c1. MediMate asks User for new valid appointment time.
- 3c2. User inputs valid appointment time. Use Case resumes at step 4.
Use case: Check the doctor’s availability on the given date
MSS
- User requests to check the doctor’s availability on the given date.
-
MediMate lists all the doctor’s current appointments on this day.
Use case ends.
- 1a. There is no appointment on this date. Use case ends.
Use case: Mark an appointment with a patient as done
MSS
- User requests to mark the appointment as done.
-
MediMate marks the appointment as done and resets to no-appointment status.
Use case ends.
Non-Functional Requirements
- Should work on any mainstream OS as long as it has Java
11or above installed. - Should be able to hold up to 1000 patients without a noticeable sluggishness in performance for typical usage.
- A user with above average typing speed for regular English text (i.e. not code, not system admin commands) should be able to accomplish most of the tasks faster using commands than using the mouse.
- Should support the use of UK and US English language.
- The system should be designed with the private doctors and receptionist in mind, ensuring that it is user-friendly and easy to navigate.
- The user interface should be kept simple and intuitive, enabling doctors to quickly learn how to use the system to perform their tasks efficiently.
- Patient data should be protected at all times, with the system incorporating robust security measures to prevent unauthorized access or disclosure.
- The system should be scalable and flexible, allowing for easy addition of new features and functionalities as the doctors’ needs evolving over time.
- The system’s architecture should be well-documented, with a clear and logical structure that makes it easy to maintain, update, and troubleshoot any issues that may arise.
Glossary
- Command Line Interface (CLI): A text-based interface used to interact with a computer program or operating system
- Graphical User Interface (GUI): A visual interface used to interact with a computer program or operating system
- Private doctors: Doctors who operate in their own practice or clinic rather than in a hospital setting
- Receptionists: Individuals who manage the front desk of a medical practice, including scheduling appointments and managing patient records
- Mainstream OS: Windows, Linux, Unix, OS-X
- Private contact detail: A contact detail that is not meant to be shared with others
- Appointment: A scheduled meeting or consultation with a private doctor.
- Patient: A person who is receiving medical treatment from a doctor or other healthcare professional.
- Medical certificate: A legal document issued by a doctor that certifies a patient’s medical condition or ability to perform certain tasks.
- NRIC: National Registration Identity Card, an identification document issued to citizens and permanent residents of Singapore.
Appendix: Instructions for manual testing
Given below are instructions to test the app manually.
Launch and shutdown
-
Initial launch
-
Download the jar file and copy into an empty folder
-
Double-click the jar file
- Expected: Shows the GUI with a set of sample contacts.
- The window size may not be optimum.
-
-
Saving window preferences
- Resize the window to an optimum size.
- Move the window to a different location.
- Close the window.
- Re-launch the app by double-clicking the jar file.
- Expected: The most recent window size and location is retained.
Adding a patient
-
Adding a new patient’s while all existing patients are shown
-
Prerequisites: List all patients using the list command.
-
Test case: add n/John Doe p/98765432 e/johnd@example.com a/John street, block 123, #01-01 Expected: John Doe is added into the list. Result Display shows a success message.
-
Test case: add n/James Ho p/22224444 e/jamesho@example.com a/123, Clementi Rd, 1234665 ag/20 n/Flu nric/S9524050Y t/friend t/colleague Expected: James Ho is added. Result Display shows a success message.
-
Test case: add n/James Lu p/22224444 e/example.com a/123, Clementi Rd, 1234665 ag/20 n/Flu nric/S9524050Y t/friend t/colleague Expected: No patient is added. Error message of wrong email format is shown on the result display.
-
Editing a patient
-
Editing a patient’s while all patients are shown
-
Prerequisites: List all patients using the list command.
-
Test case: edit 1 n/James Lee e/jameslee@example.com Expected: The name of the first patient and email is changed to James Lee and jameslee@example.com respectively. Result display shows a success message.
-
Test case: edit 1 Expected: The first patient remains the same. Error message shown in the result display.
-
Test case: edit 0 t/friend Expected: No patient is edited. Error message shown in the result display.
-
Deleting a patient
-
Deleting a patients while all persons are being shown
-
Prerequisites: List all persons using the
listcommand. Multiple persons in the list. -
Test case:
delete 1
Expected: An alert window will prompt up and ask user to confirm this deletion. Once confirmed, the first patient is deleted from the list. Details of the deleted contact shown in the status message. Timestamp in the status bar is updated. -
Test case:
delete 0
Expected: No person is deleted. Error details shown in the status message. Status bar remains the same. -
Other incorrect delete commands to try:
delete,delete x,...(where x is larger than the list size)
Expected: Similar to previous.
-
Saving data
-
Dealing with corrupted data files
- Open data/addressbook.json in the directory where MediMate is located at.
- On line 4, edit the word phone to phon.
- Relaunch MediMate.jar. Expected: Data is corrupted and the system will recognise the mismatch. MediMate starts with an empty data file.
-
Dealing with missing data files
- Delete the file addressbook.json in the data directory where MediMate is located at.
- Relaunch MediMate.jar.
- Expected: Data file is missing. MediMate starts with an initial data file.